npm is the standard package manager for Node.js, providing the infrastructure required to share, version, and install code dependencies across the JavaScript ecosystem.
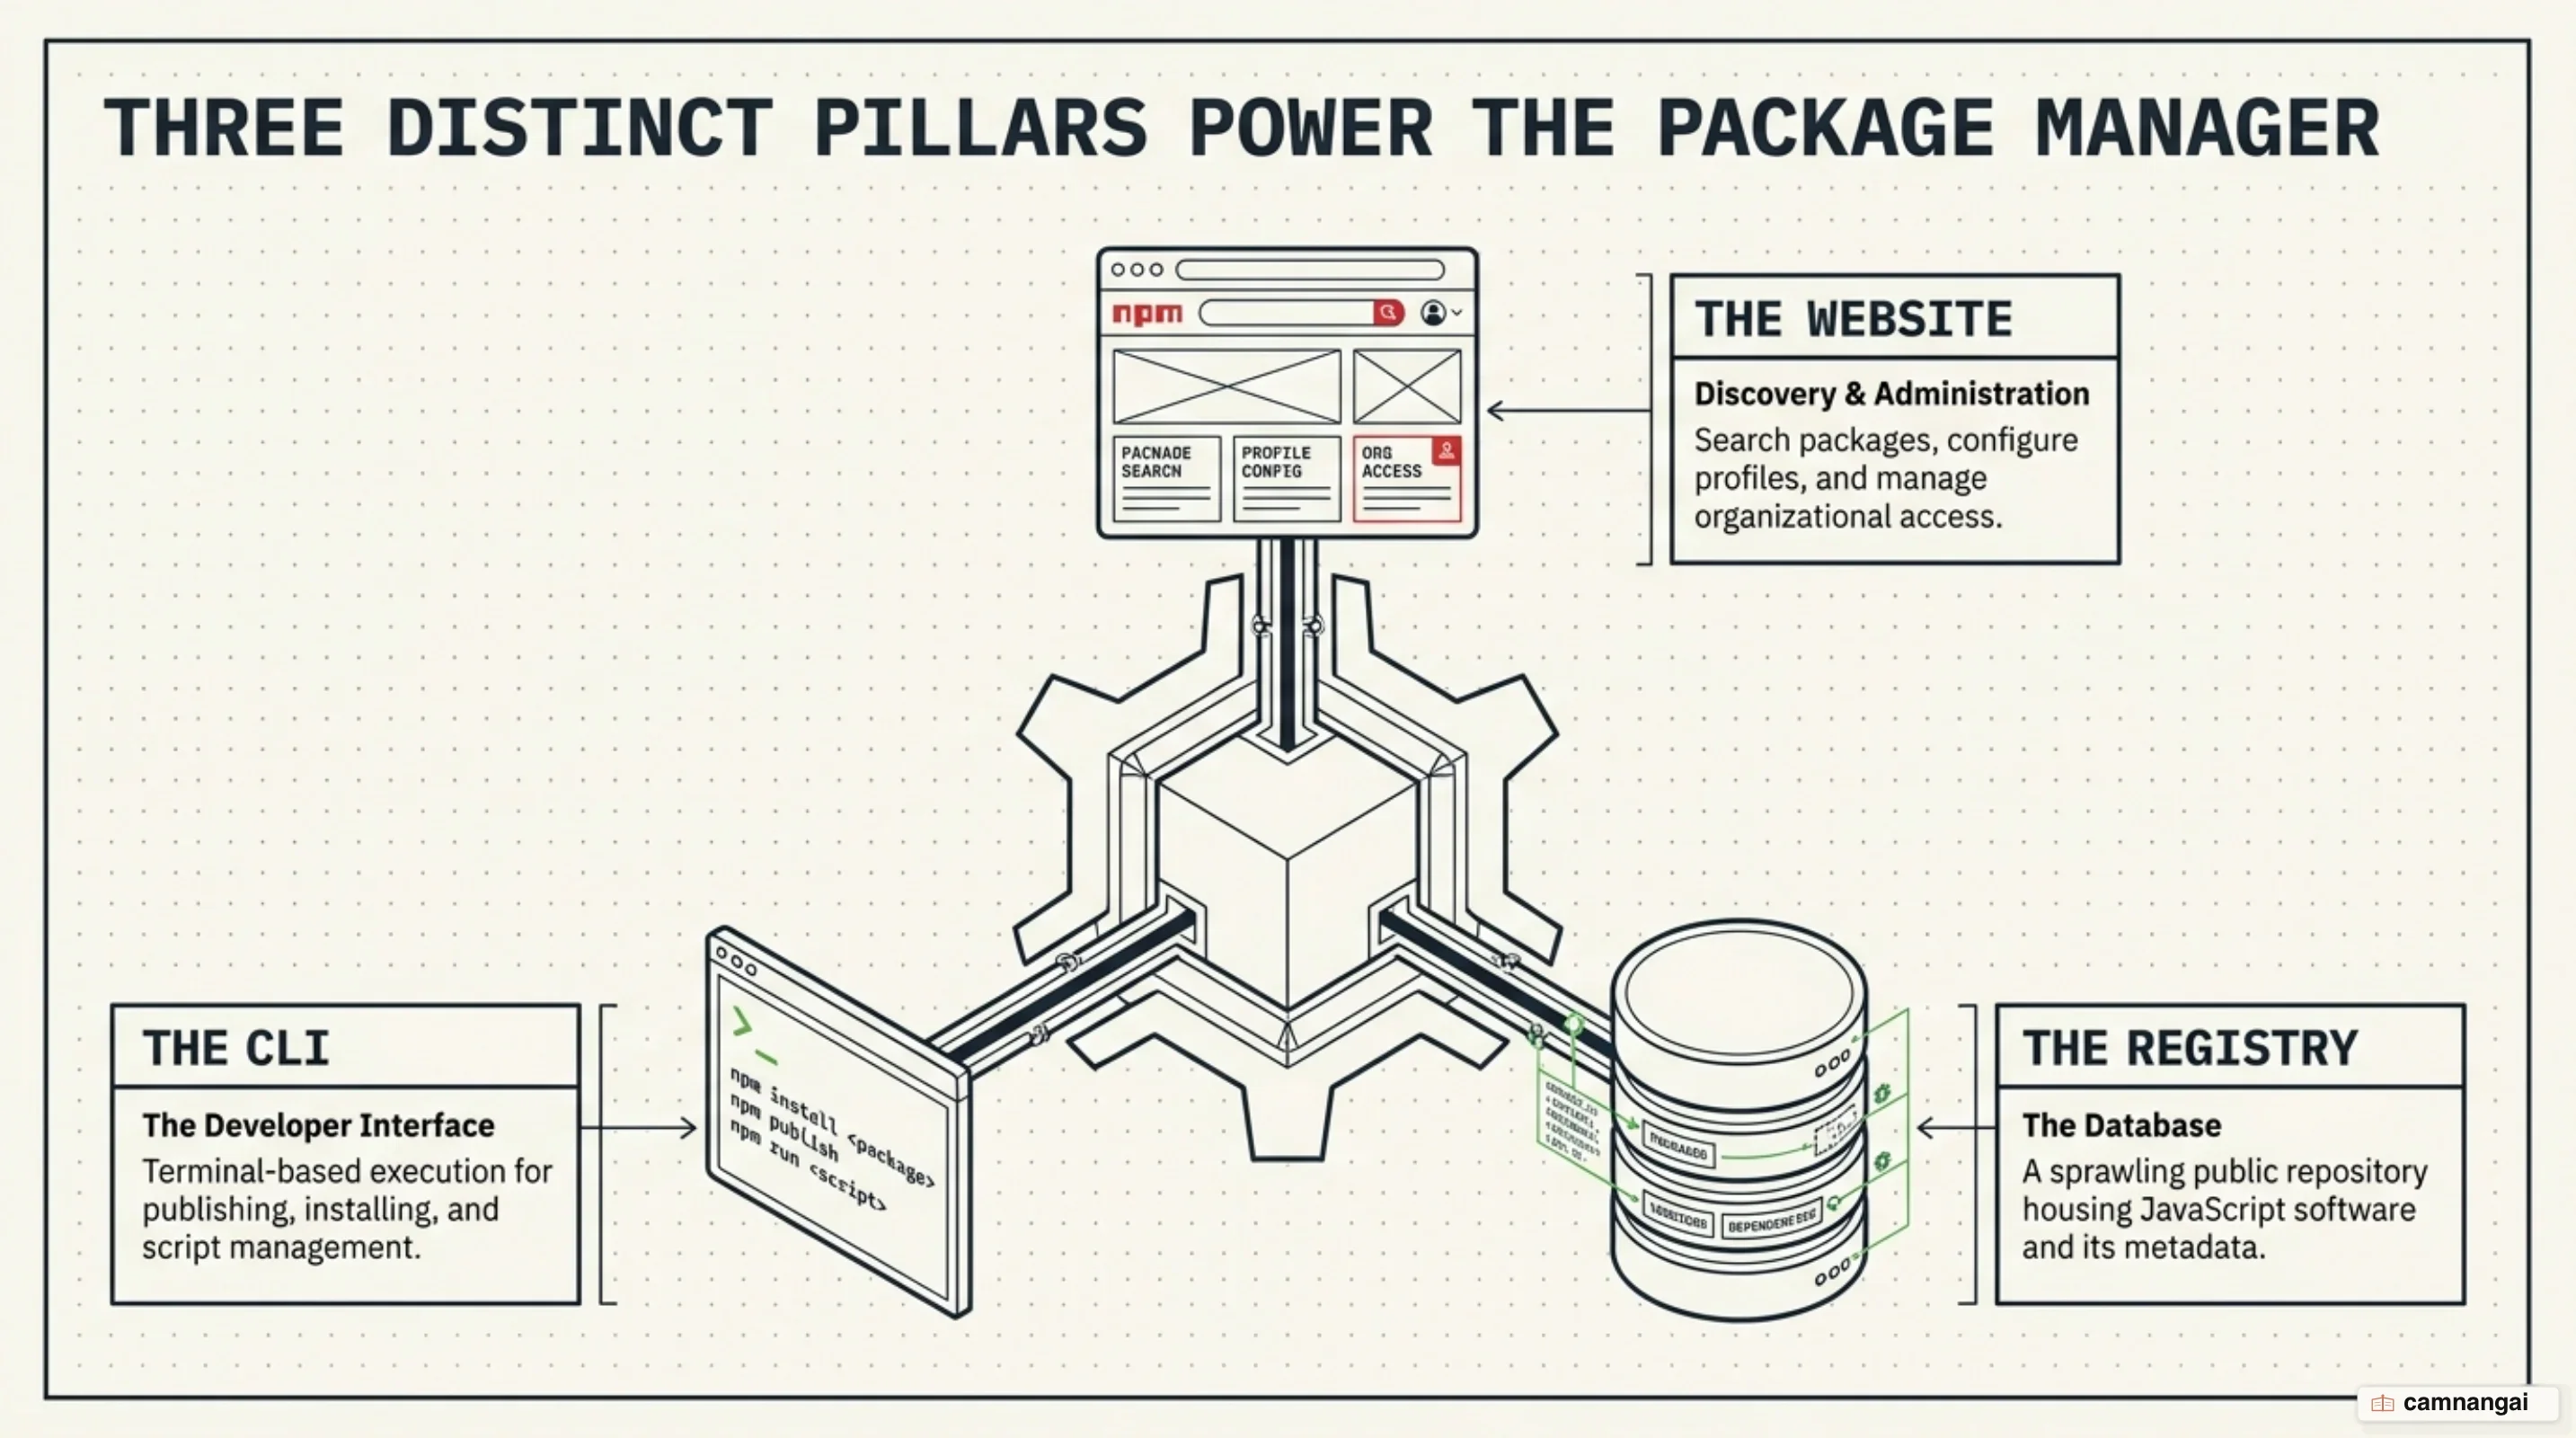
It operates as a three-tier system: a public registry of versioned software, a command-line interface (CLI) for local package management, and a website for discovery and organization management.
By establishing a centralized protocol for dependency distribution, npm lets you manage complex JavaScript codebases, ensuring that specific library versions are retrieved and integrated into the application runtime. This infrastructure supports both open-source collaboration and private organizational workflows through a permission-based registry.
For any engineer working with the Node.js runtime, npm is the default mechanism for retrieving, updating, and auditing code.
Its components work together to keep dependency trees navigable and reproducible across development and deployment environments.
What is npm?
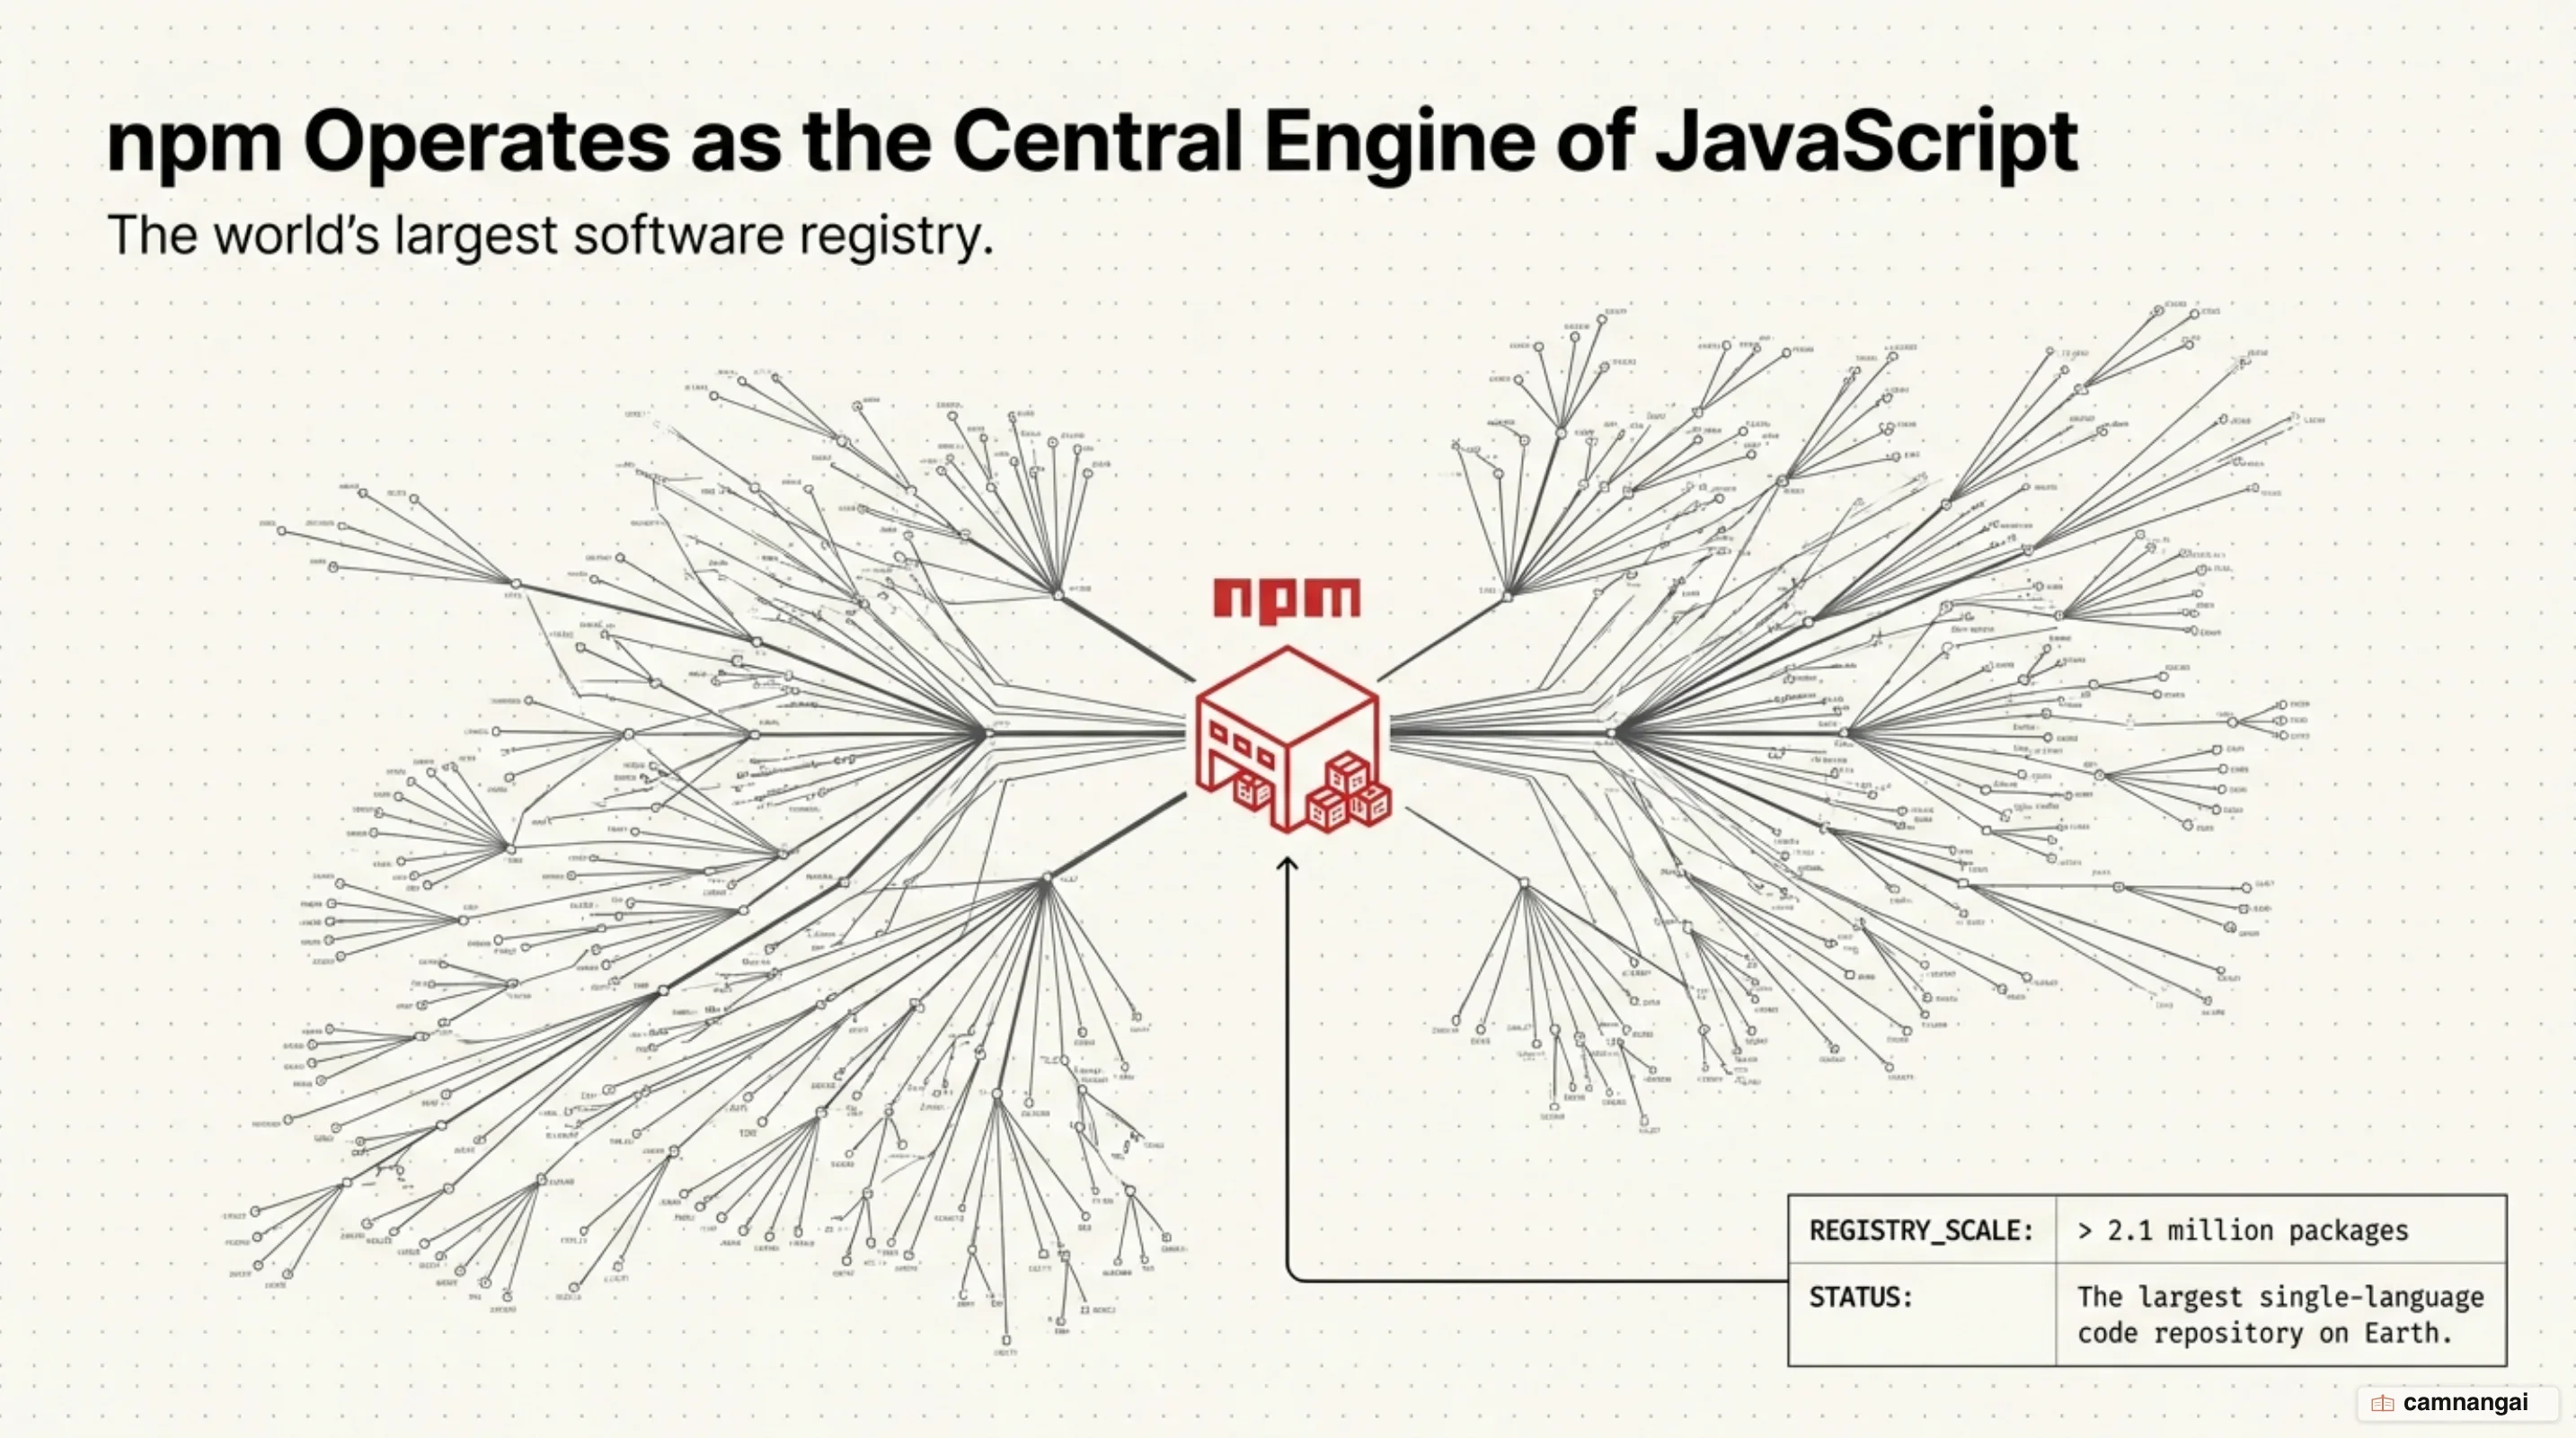
npm has three parts that work together: the website, the command-line interface (CLI), and the public registry. The website is where you find packages and manage organizations and teams. The CLI is what resolves dependencies on your machine and on CI/CD runners. Behind both sits the registry, the world's largest software database, which hosted over 2.1 million packages as of late 2022.
You reach for npm to pull external packages into an application, run standalone tools via npx
without installing them permanently, and control whether a module is public or private. Larger
organizations use the same hooks to restrict code access to specific teams while keeping one
workflow for internal and external dependencies.
Underneath, the CLI talks to the registry's CouchDB-based database to manage package metadata. When you initiate a request, the CLI queries the registry for a JSON document containing the package's version history and metadata. This metadata includes the specific URLs for compressed tarballs and their associated cryptographic hashes.
The CLI does not merely download files; it performs a multi-step resolution process. It first reconciles the requested version range against available versions in the registry, then fetches the manifest to identify transitive dependencies. Once the full dependency tree is resolved, the CLI downloads the required tarballs, verifies their integrity against the registry's hash, and extracts them into the local environment.
package.json: the file that declares your project
The package.json file is the manifest for a Node.js project, acting as the source of truth for
dependency resolution. It tracks metadata such as the project name and version, while explicitly
declaring the libraries required to execute the application. Any developer or automated environment
can replicate the project's dependency tree by referencing the versions documented in the manifest.
Without this file, the npm CLI cannot identify which libraries to download or how to execute
project-specific scripts.
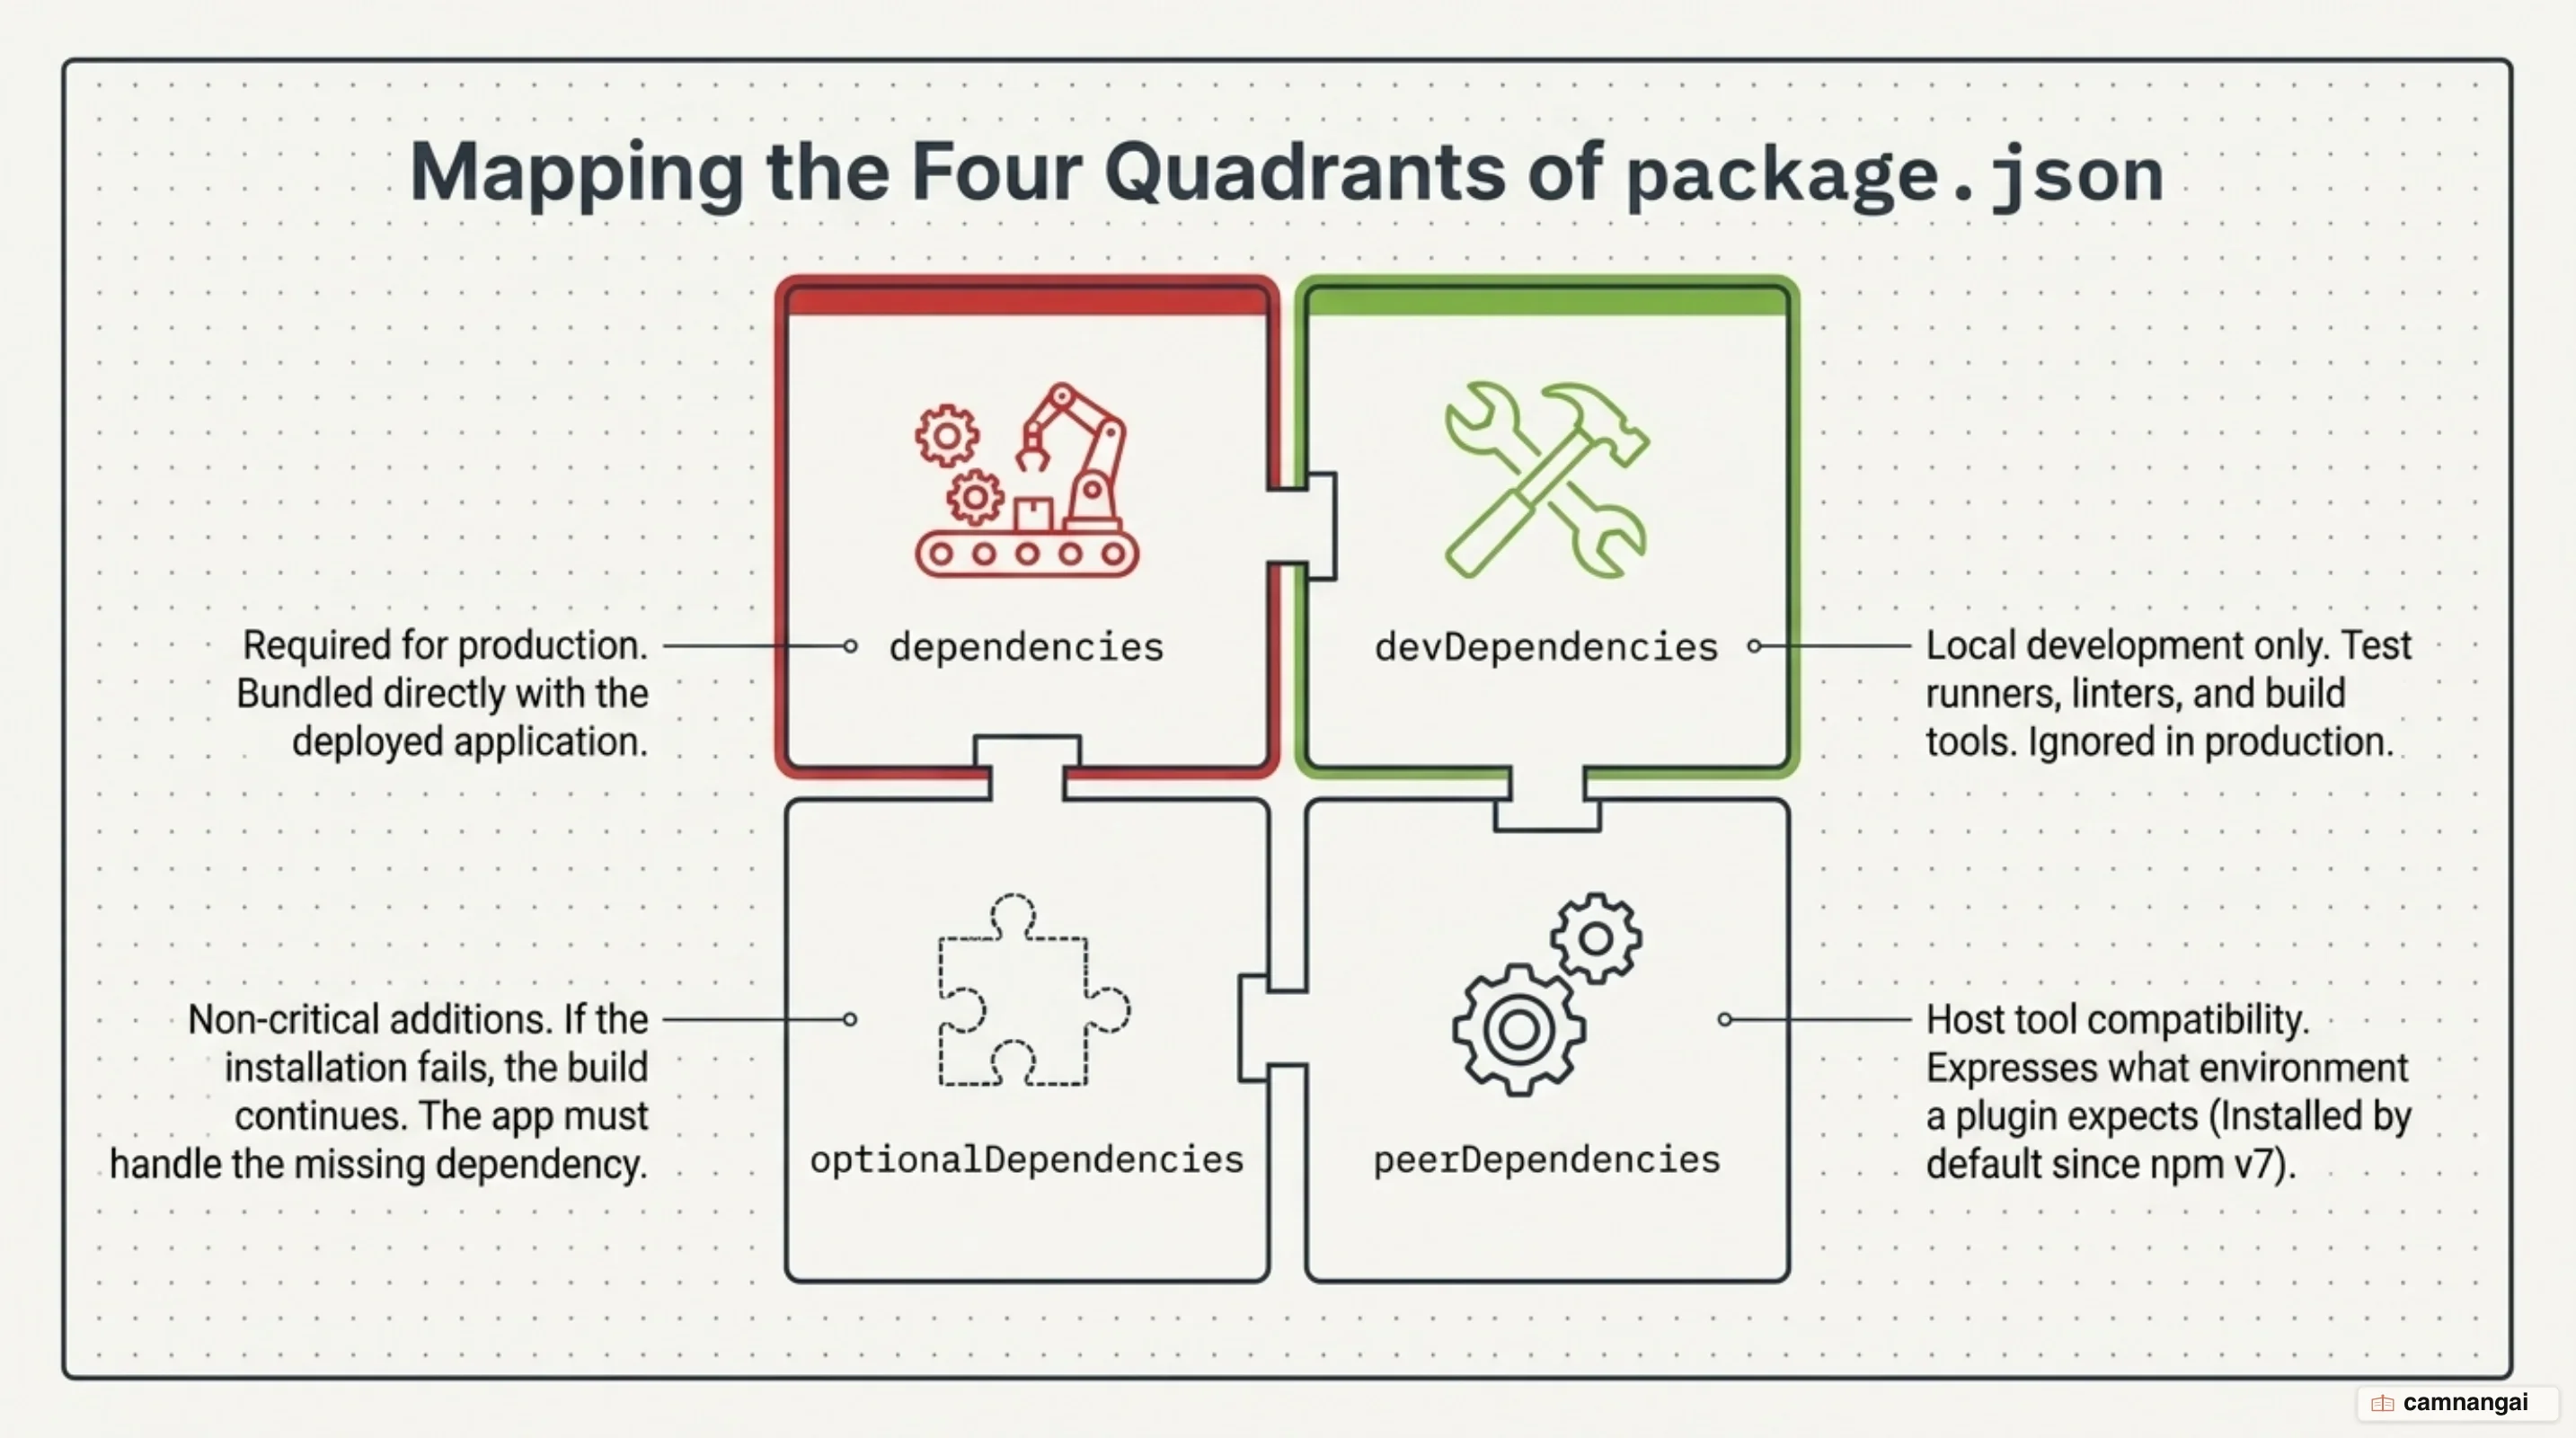
The manifest splits dependencies in two, and the split matters. Libraries the application needs at
runtime go under dependencies.
Conversely, devDependencies are reserved for development-time tools, such as the Jest testing
framework or build utilities like Webpack, which are not needed in production. When deploying, you
can use --omit=dev to exclude these development tools, reducing the final footprint and minimizing
the attack surface of the production build.
Since npm 5, the CLI updates this manifest for you. Flags like --save-dev (shorthand -D) or --save-optional (shorthand -O) during
installation automatically create the corresponding entry in the package.json file. Optional
dependencies are unique because their failure to build or install does not cause the overall
installation to fail; your application logic must account for the potential absence of these
modules. peerDependencies serve a different purpose, common when building a plugin or companion
library that requires the host project to already provide a specific version of a base library such
as React.
The manifest also carries the Semantic Versioning ranges that determine how the CLI updates packages. By defining these ranges, you control the balance between inheriting the latest security patches and maintaining a stable, unchanging codebase. A typical project uses this manifest to manage dozens or hundreds of direct dependencies, which in turn pull in thousands of transitive dependencies, making the manifest the anchor for the entire project architecture.
{
  "name": "enterprise-service-mesh",
  "version": "1.0.0",
  "dependencies": {
    "express": "^4.18.2",
    "helmet": "^7.0.0"
  },
  "devDependencies": {
    "jest": "^29.5.0",
    "typescript": "^5.0.0"
  },
  "optionalDependencies": {
    "fsevents": "^2.3.2"
  }
}
Semver: what ^ and ~ actually allow
Semantic Versioning (Semver) is the protocol used to signal API stability and breaking changes via
a MAJOR.MINOR.PATCH format. MAJOR versions indicate breaking API changes, MINOR versions add
backward-compatible functionality, and PATCH versions provide backward-compatible bug fixes. npm
relies on these signals to decide whether to fetch a newer version from the registry or stay with
the current local installation.
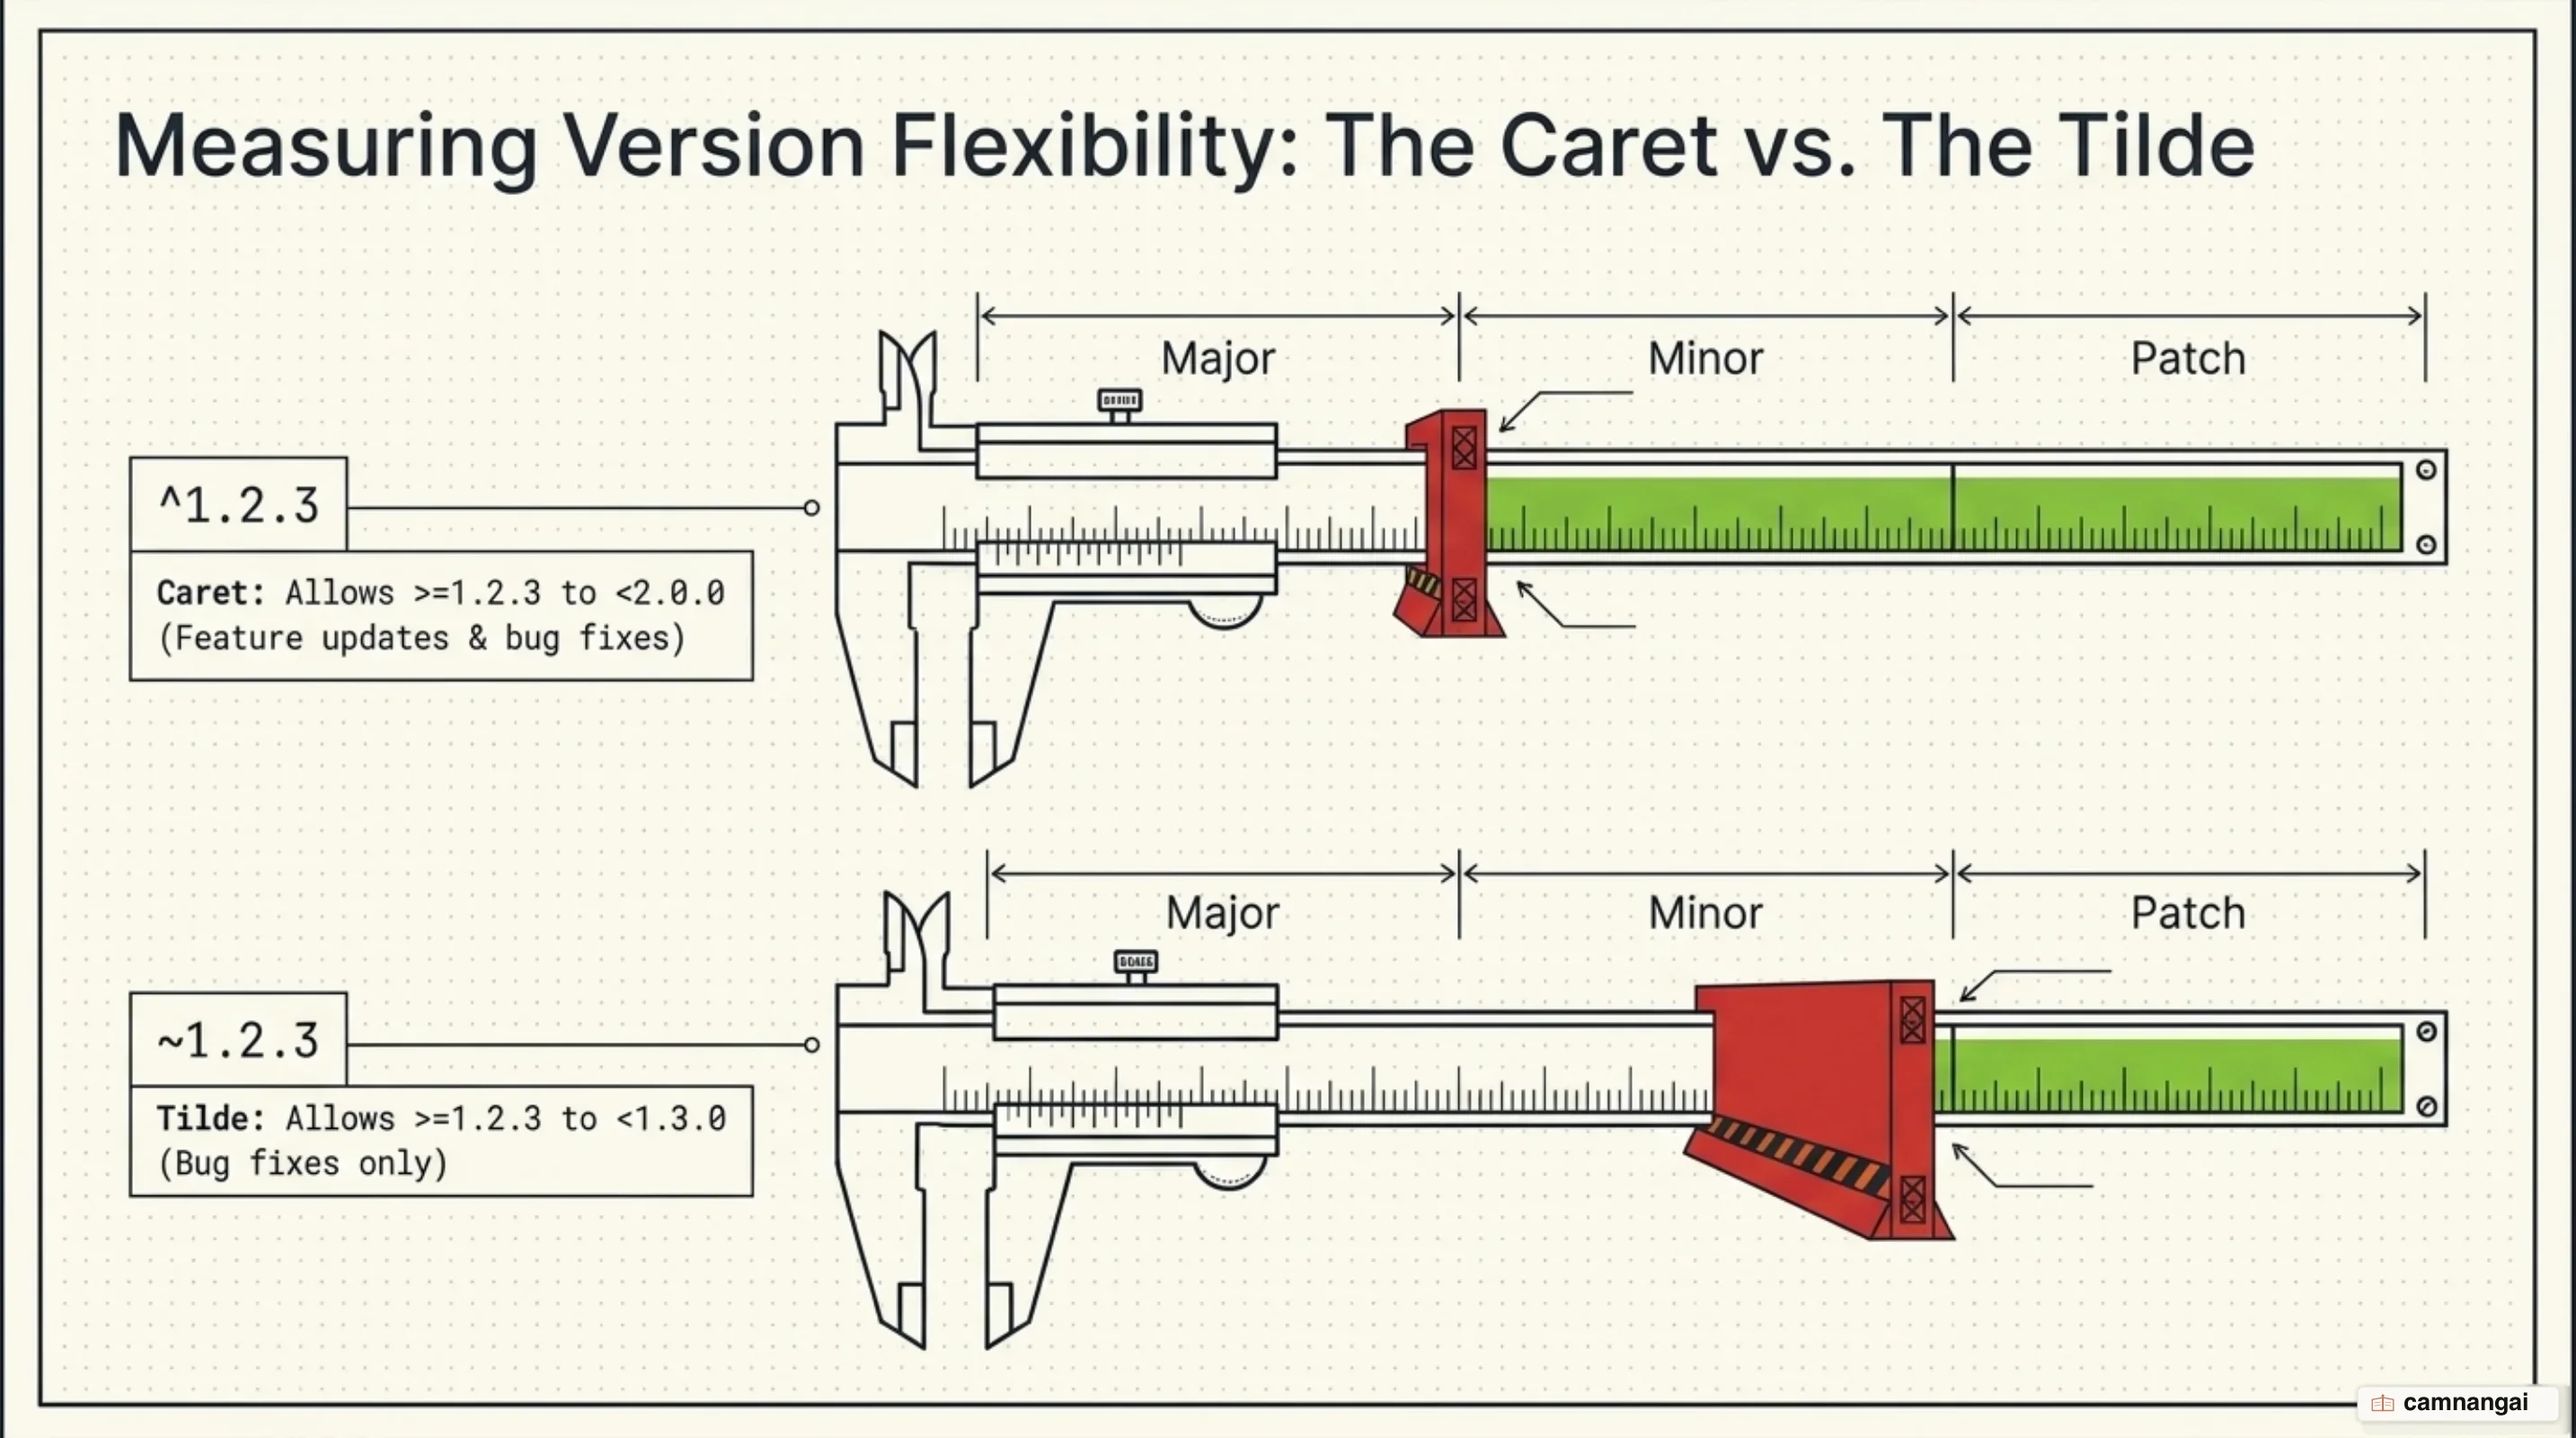
The tilde (~) is a conservative specifier that allows only patch updates: ~1.2.3 allows anything
below 1.3.0. It assumes the maintainer will only include non-breaking bug fixes in patch releases,
which gives your project stability while still inheriting security patches automatically. The caret
(^) is the default specifier, allowing minor and patch updates: ^1.2.3 allows anything below
2.0.0. It became the default save prefix in npm 1.4.22 because it lets projects safely inherit
un-backported bug fixes.
The "Magic Zero" (0.x.y) behavior is a critical nuance. Semver treats major version zero as
initial development, where the API is considered unstable, so the caret becomes more cautious. For
0.0.z releases, the caret allows zero flexibility and pins to the exact version. For 0.y.z
releases, the caret behaves exactly like a tilde, allowing only patch updates. This logic exists
because, in the pre-1.0.0 ecosystem, the community treats the minor version as the indicator for
breaking changes.
This "1.0.0 anxiety" is prevalent throughout the registry: approximately 82% of all packages remain
at major version zero. Authors often stay in this state to avoid the perceived commitment of a
stable API, essentially reinterpreting the Semver spec to use the second segment as the primary
breaking-change indicator. To counter the trend, modern versions of npm init (starting from
v1.4.22) changed the default starting version from 0.0.0 to 1.0.0, pushing developers through
the imaginary 1.0.0 barrier toward more rigorous major version bumps.
What npm install does to node_modules
When you execute npm install, the CLI initiates a resolution process to reconcile the dependency
requirements defined in your project manifest. The tool parses the package.json file, fetches the
necessary tarballs from the registry, and populates a local node_modules folder. This folder
stores all libraries and their nested dependencies, making them available to the Node.js runtime.
The process verifies that every dependency's internal requirements are also met, often leading to a
large expansion of the local file count.
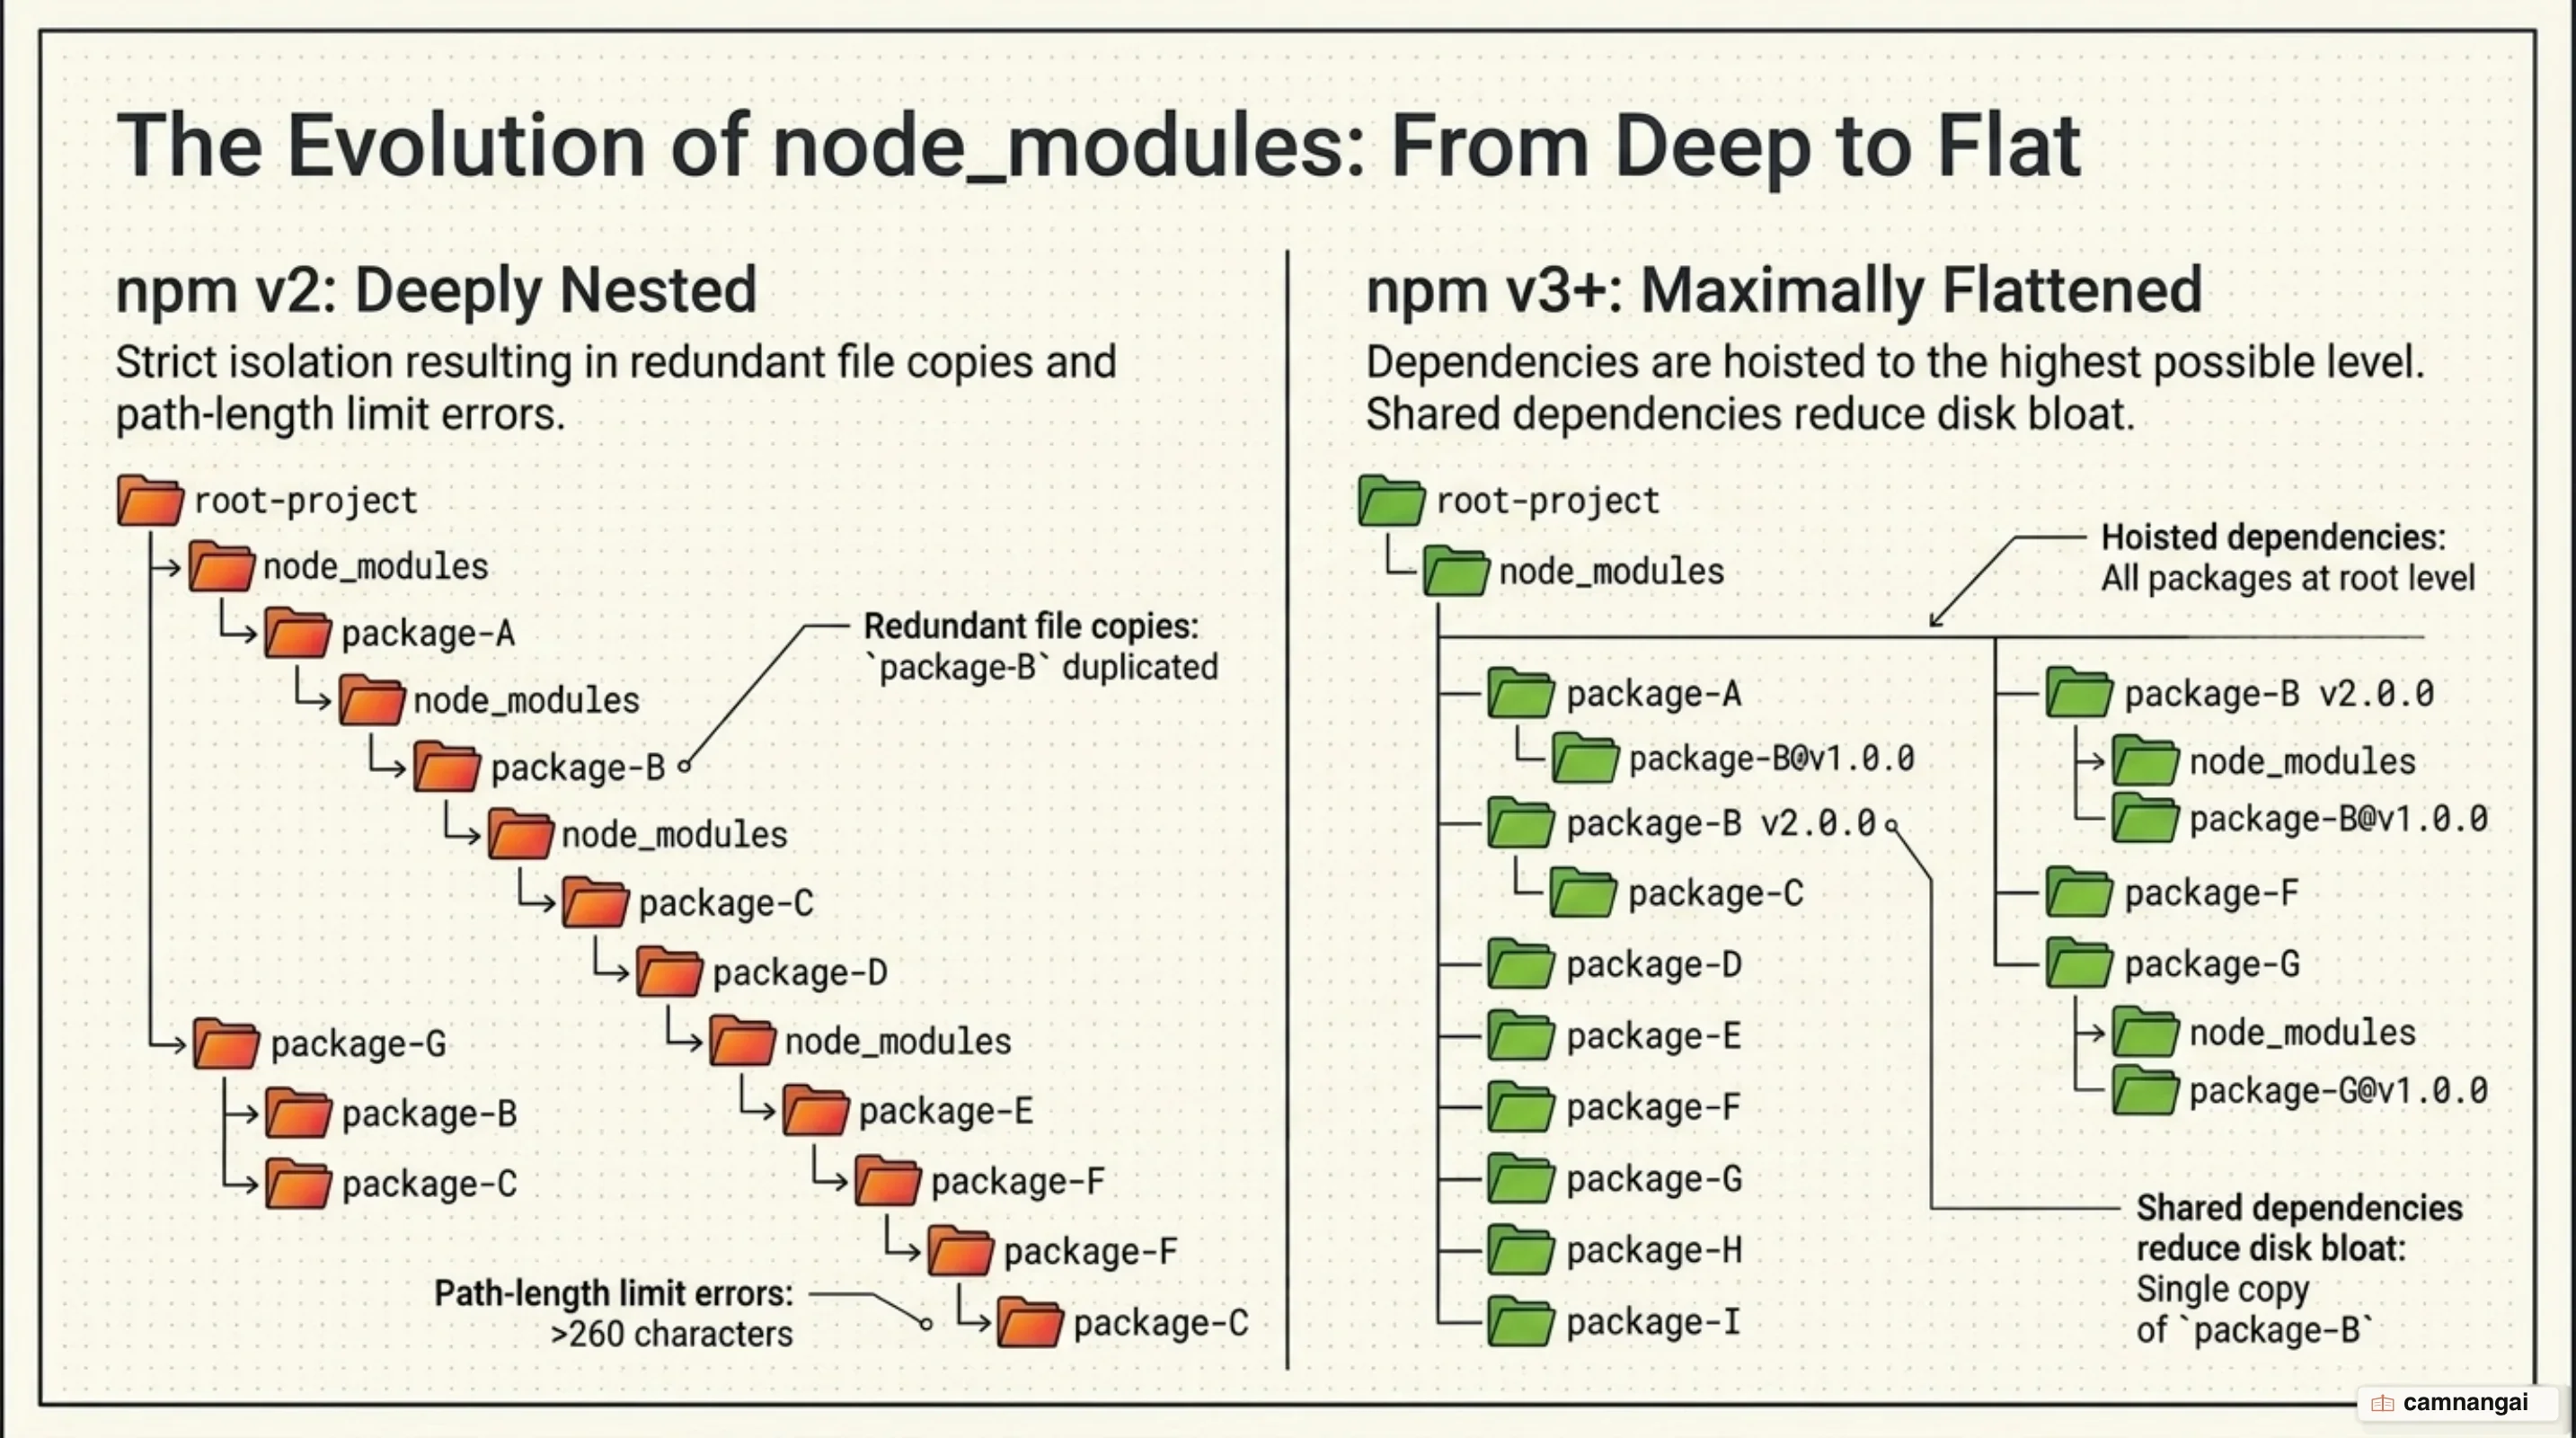
The shape of node_modules changed to save space and dodge a system limit. In npm v2, the
dependency tree was strictly nested, producing deep folder
structures that often exceeded path length limits on Windows. Since npm v3, the tool uses a flat
directory structure, hoisting as many dependencies as possible to the top level of node_modules.
This flattening reduces duplication and lets different packages requiring the same version share a
single physical installation on disk.
Version conflicts are where the installation algorithm earns its keep. If two dependencies
require different, incompatible versions of the same sub-dependency, npm cannot hoist both to
the top level. It nests the conflicting version inside the specific package that requires it, while
keeping the primary version at the root. This dual-model resolution ensures the Node.js require
mechanism finds the correct version of every library based on the filesystem hierarchy.
Since npm 5, the CLI also updates the manifest during installation. If you install a package using
npm install <package-name>, the tool automatically adds the entry to your package.json, removing
the historical requirement for the --save flag. Running the install command without arguments
syncs the node_modules folder with the current package.json and package-lock.json definitions.
package-lock.json and npm ci: why installs stay identical
The package-lock.json file is an automatically generated snapshot of the entire dependency tree as
it existed during the last installation. While package.json allows flexible version ranges using
caret or tilde, the lockfile records the exact version of every single package installed, including
every nested transitive dependency. Every engineer on a team and every build server installs an
identical set of files, which eliminates the "it works on my machine" failures caused by one
environment pulling a slightly newer minor version.
The lockfile also verifies what you download, through an integrity field on every entry. This field contains a Subresource Integrity string, typically using a SHA-512
hash, to verify that the downloaded tarball has not been corrupted or tampered with. When an install
is triggered, npm compares the hash of the downloaded file against the hash stored in the
lockfile. On a mismatch, the CLI aborts, protecting the environment from code that differs from the
originally audited version.
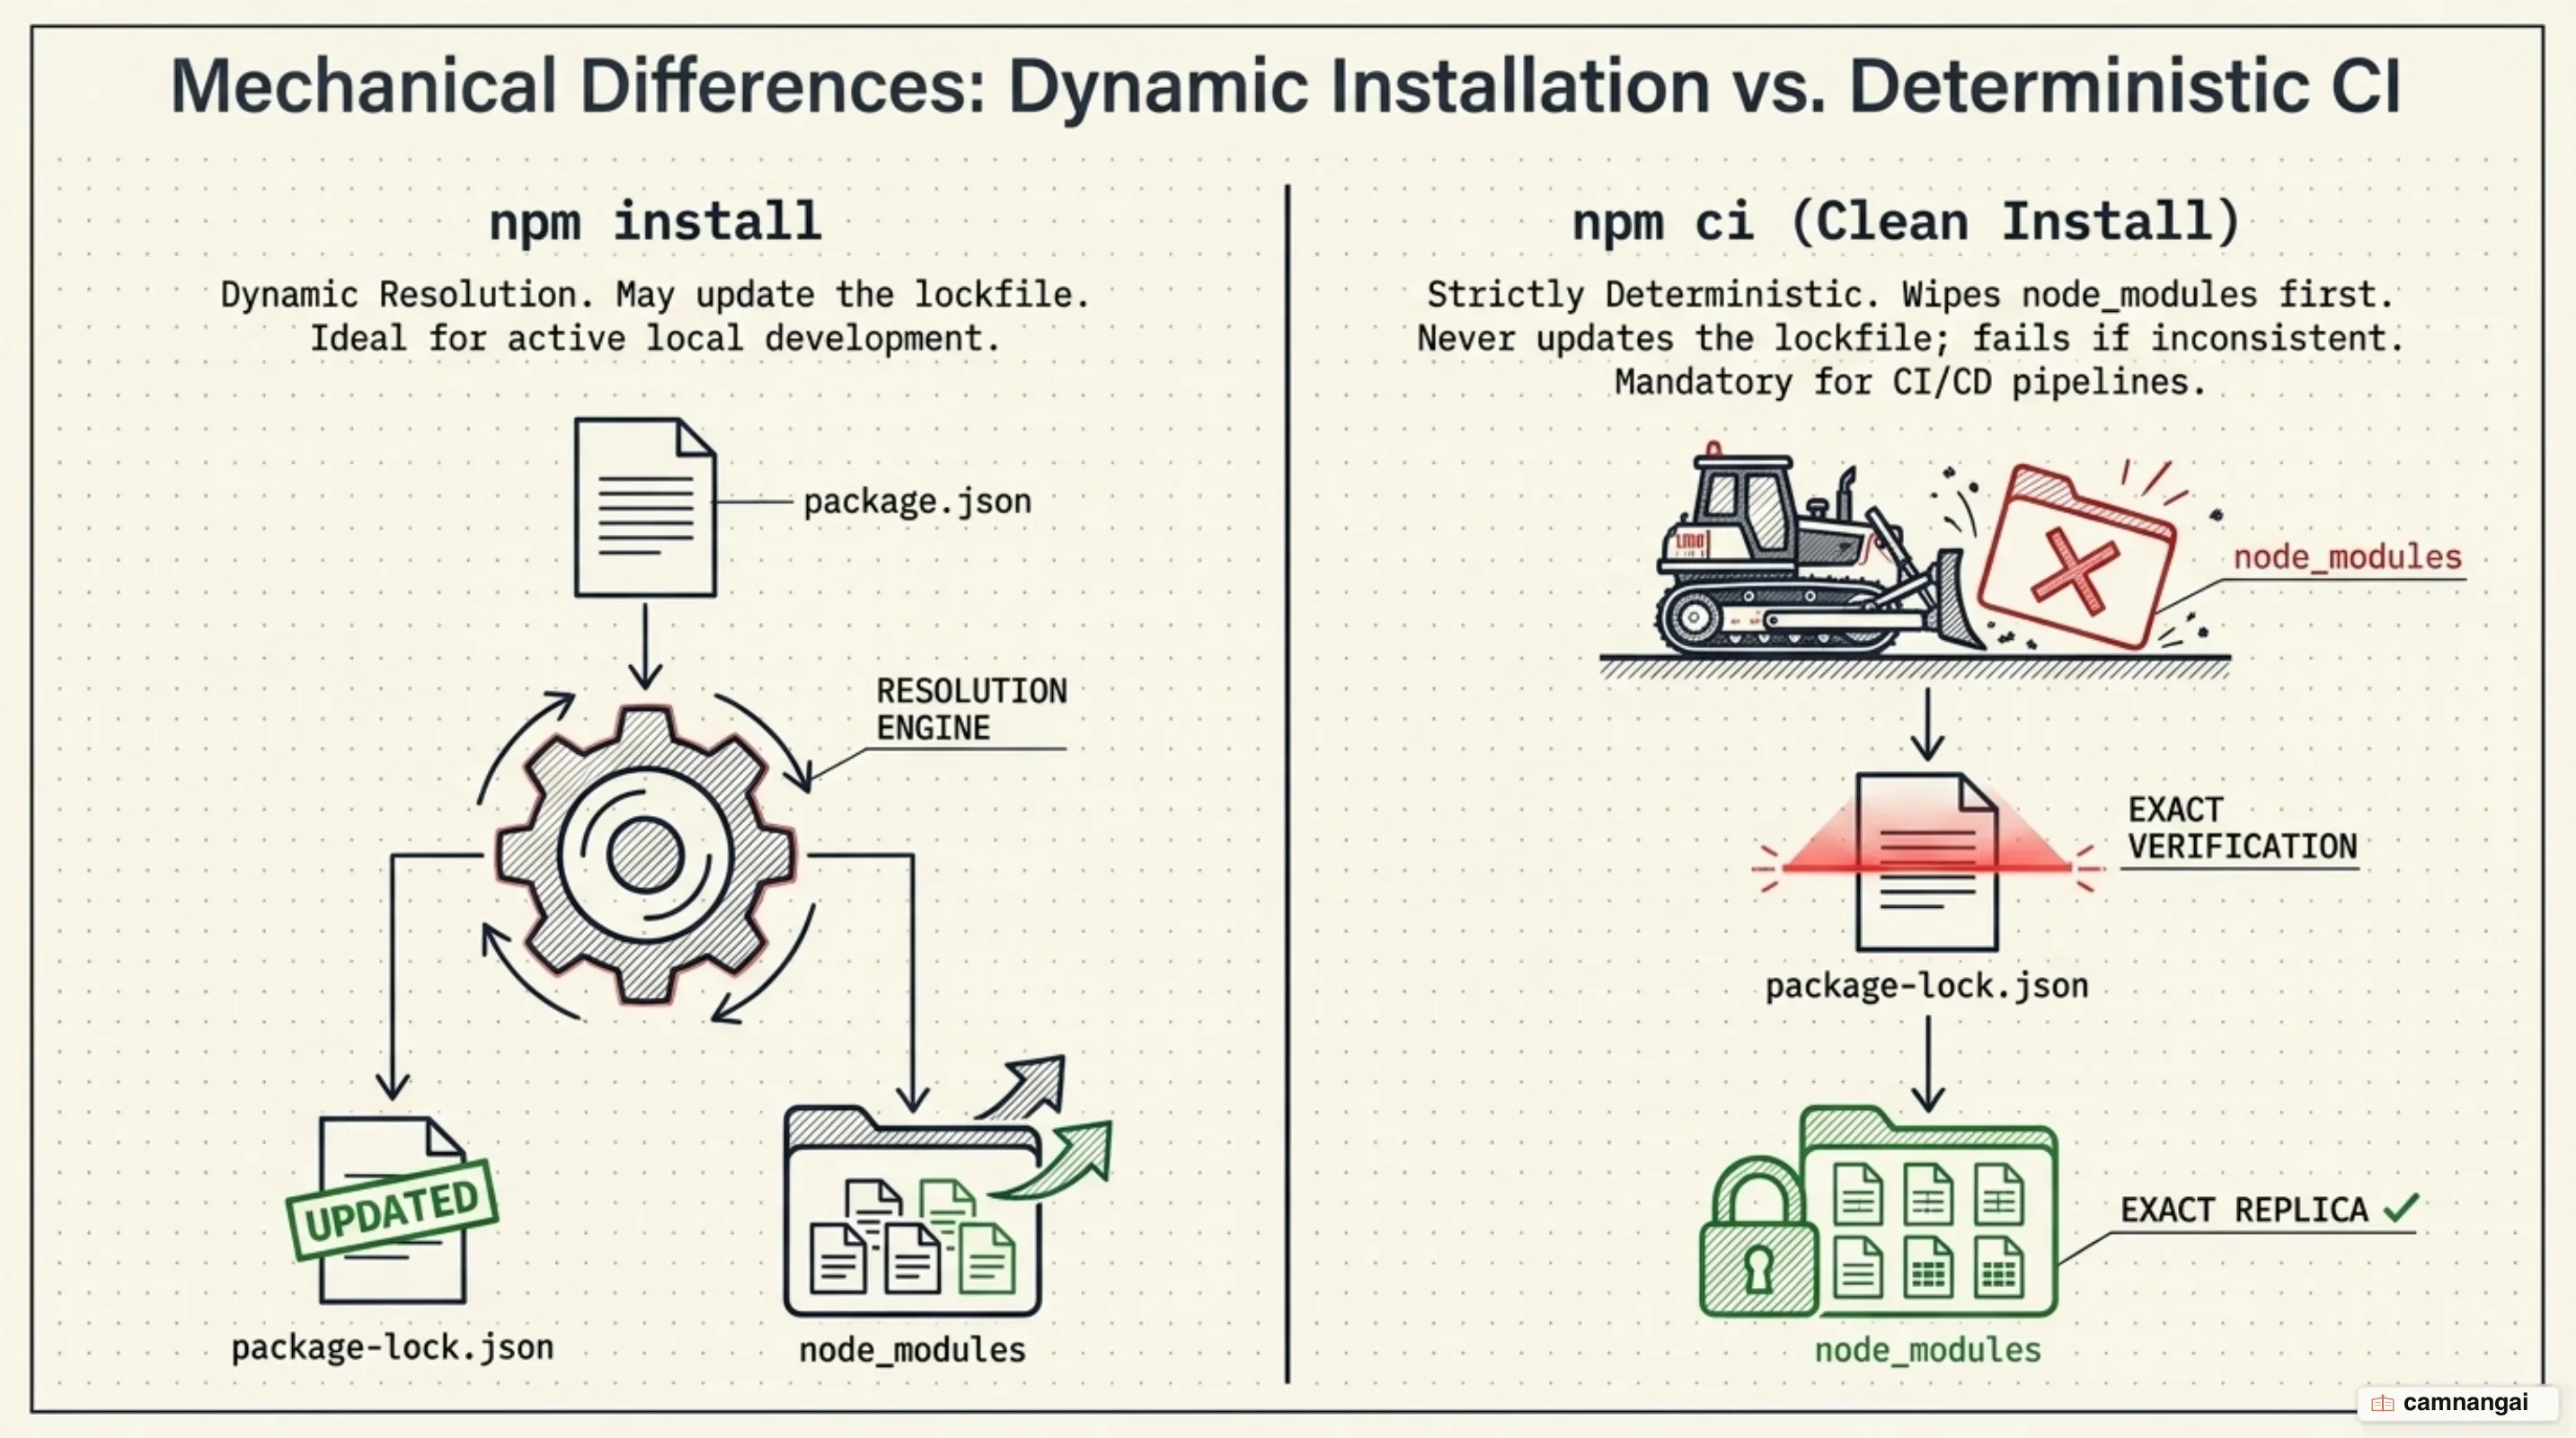
The npm ci command is designed for automated environments where deterministic builds are
mandatory. Unlike npm install, which is permitted to modify the lockfile if it finds newer
compatible versions, npm ci strictly adheres to package-lock.json. It throws an error and fails
the build if the lockfile does not match the manifest. It also deletes the existing node_modules
folder before starting, so no stale artifacts remain — making it both faster and more reliable for
production deployments.
Always commit package-lock.json to version control so the exact state of your dependencies is
preserved. The
lockfile also speeds up installation by providing a pre-computed dependency tree, reducing the I/O
and CPU overhead of resolving complex version constraints. Using npm ci in your deployment
pipeline ensures the code running in production is an exact match of the code that passed your
tests.
npm scripts: running project tasks with one command
The scripts property in package.json lets you define aliases for complex or frequently used
command-line tasks. This provides a standardized way to execute project-specific workflows, such as
starting a local development server, running a test suite, or executing a production build. Scripts
hide the complexity of underlying tool configurations — long strings of arguments for Webpack, Vite,
or TypeScript — behind simple, memorable commands.
Instead of requiring every developer to remember long strings of CLI arguments, you provide a
unified interface via npm run <task-name>. A developer only needs to type npm run build to
execute a process that might involve multiple environment variables and configuration flags.
Standard scripts like start and test are common enough that they can be run without the run
keyword, though npm run remains the universal invocation for custom aliases.
These tasks execute within a shell environment that has the local node_modules/.bin folder added
to PATH. This is a critical detail because it lets you call installed binaries directly without
their full file paths. If you have Jest installed as a devDependency, your test script can simply be
jest rather than ./node_modules/.bin/jest. That isolation ensures the project uses the specific
version of the tool installed in its own node_modules, rather than a different version installed
globally.
Common script configurations include tools for testing, linting, and server execution, and you can chain scripts together using standard shell operators. These tasks are the primary way CI/CD pipelines interact with your project, providing a predictable entry point for building and testing. Centralizing these commands in the manifest means the logic for how the application is built and run is versioned alongside the source code.
{
  "scripts": {
    "start": "node server.js",
    "test": "jest",
    "build": "webpack --config webpack.config.js"
  }
}
Install scripts and supply chain risk: what npm v12 changed
The npm ecosystem faces substantial supply chain risk from lifecycle hooks such as preinstall
and postinstall, which let package authors execute arbitrary shell code on your machine during
installation. Threat actors have weaponized these scripts in campaigns such as the Shai-Hulud worm
to steal sensitive credentials, specifically NPM_TOKEN and GITHUB_TOKEN values. Those tokens are
then used to infect and republish legitimate packages automatically, creating a wormable propagation
vector that compromises the registry at scale.
Attacks like the Miasma RAT have demonstrated increasing technical depth. These payloads target
continuous integration runners, reading /proc/<Runner.Worker>/mem to extract OpenID Connect tokens
minted lazily in runner memory, then posting them directly to the registry. Others poison
GitHub Actions caches, overwriting stored pnpm or npm artifacts so
malicious code enters a maintainer's later builds.
Adversaries now use resilient, decentralized command-and-control infrastructure. Recent variants
deliver secondary payloads over IPFS and monitor Ethereum smart contracts as a decentralized
registry of active nodes, with Nostr relays and BitTorrent DHT routines as fallbacks when primary
addresses are blocked. One payload installs a background service that polls the GitHub API with the
stolen token every 60 seconds; if the token is revoked, it executes rm -rf ~/ and destroys the
user's home directory.
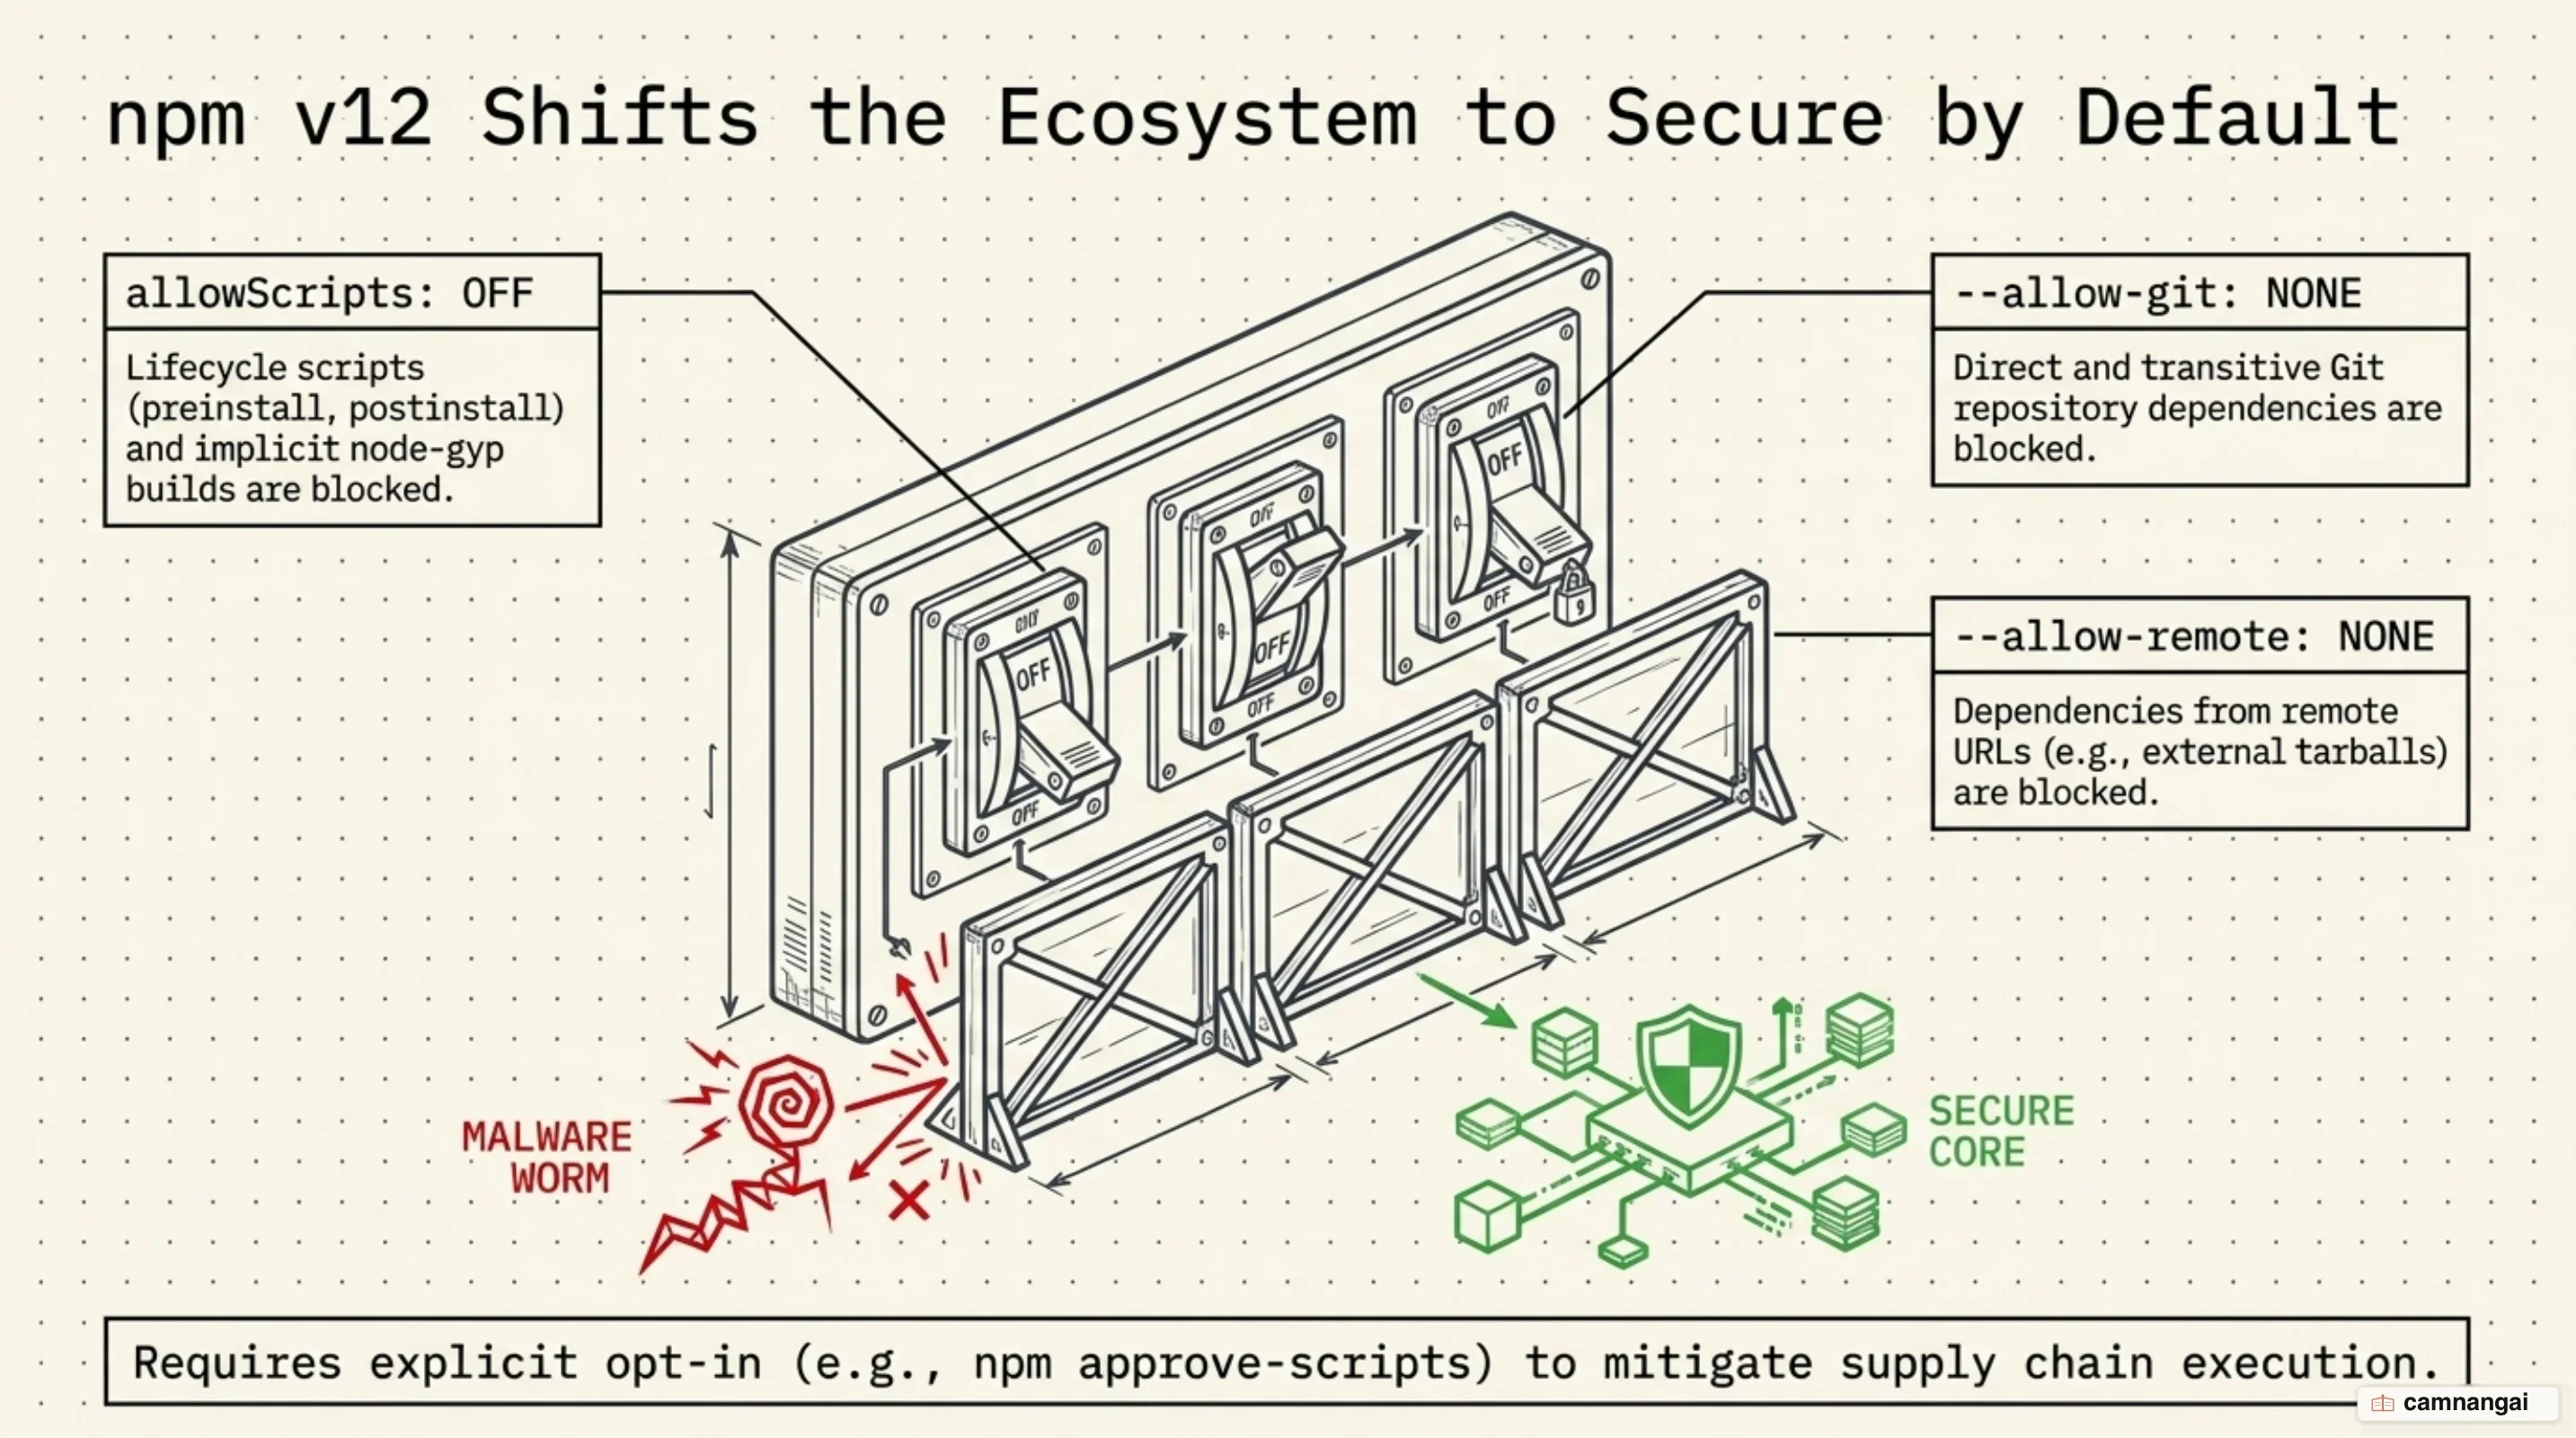
npm v12 answers this by changing the defaults themselves. Three install behaviors that used to run
automatically are now opt-in: allowScripts defaults to off, so dependency lifecycle scripts
(preinstall, install, postinstall) and implicit node-gyp builds no longer run; --allow-git
defaults to none, so Git dependencies are no longer resolved; and --allow-remote defaults to
none, so dependencies from remote URLs are no longer resolved. To review and approve the scripts
you trust, run npm approve-scripts --allow-scripts-pending and commit the resulting allowlist in
package.json. All three were available behind warnings in npm 11.16.0+, so you can prepare before
upgrading.
npm, Yarn or pnpm: how they differ
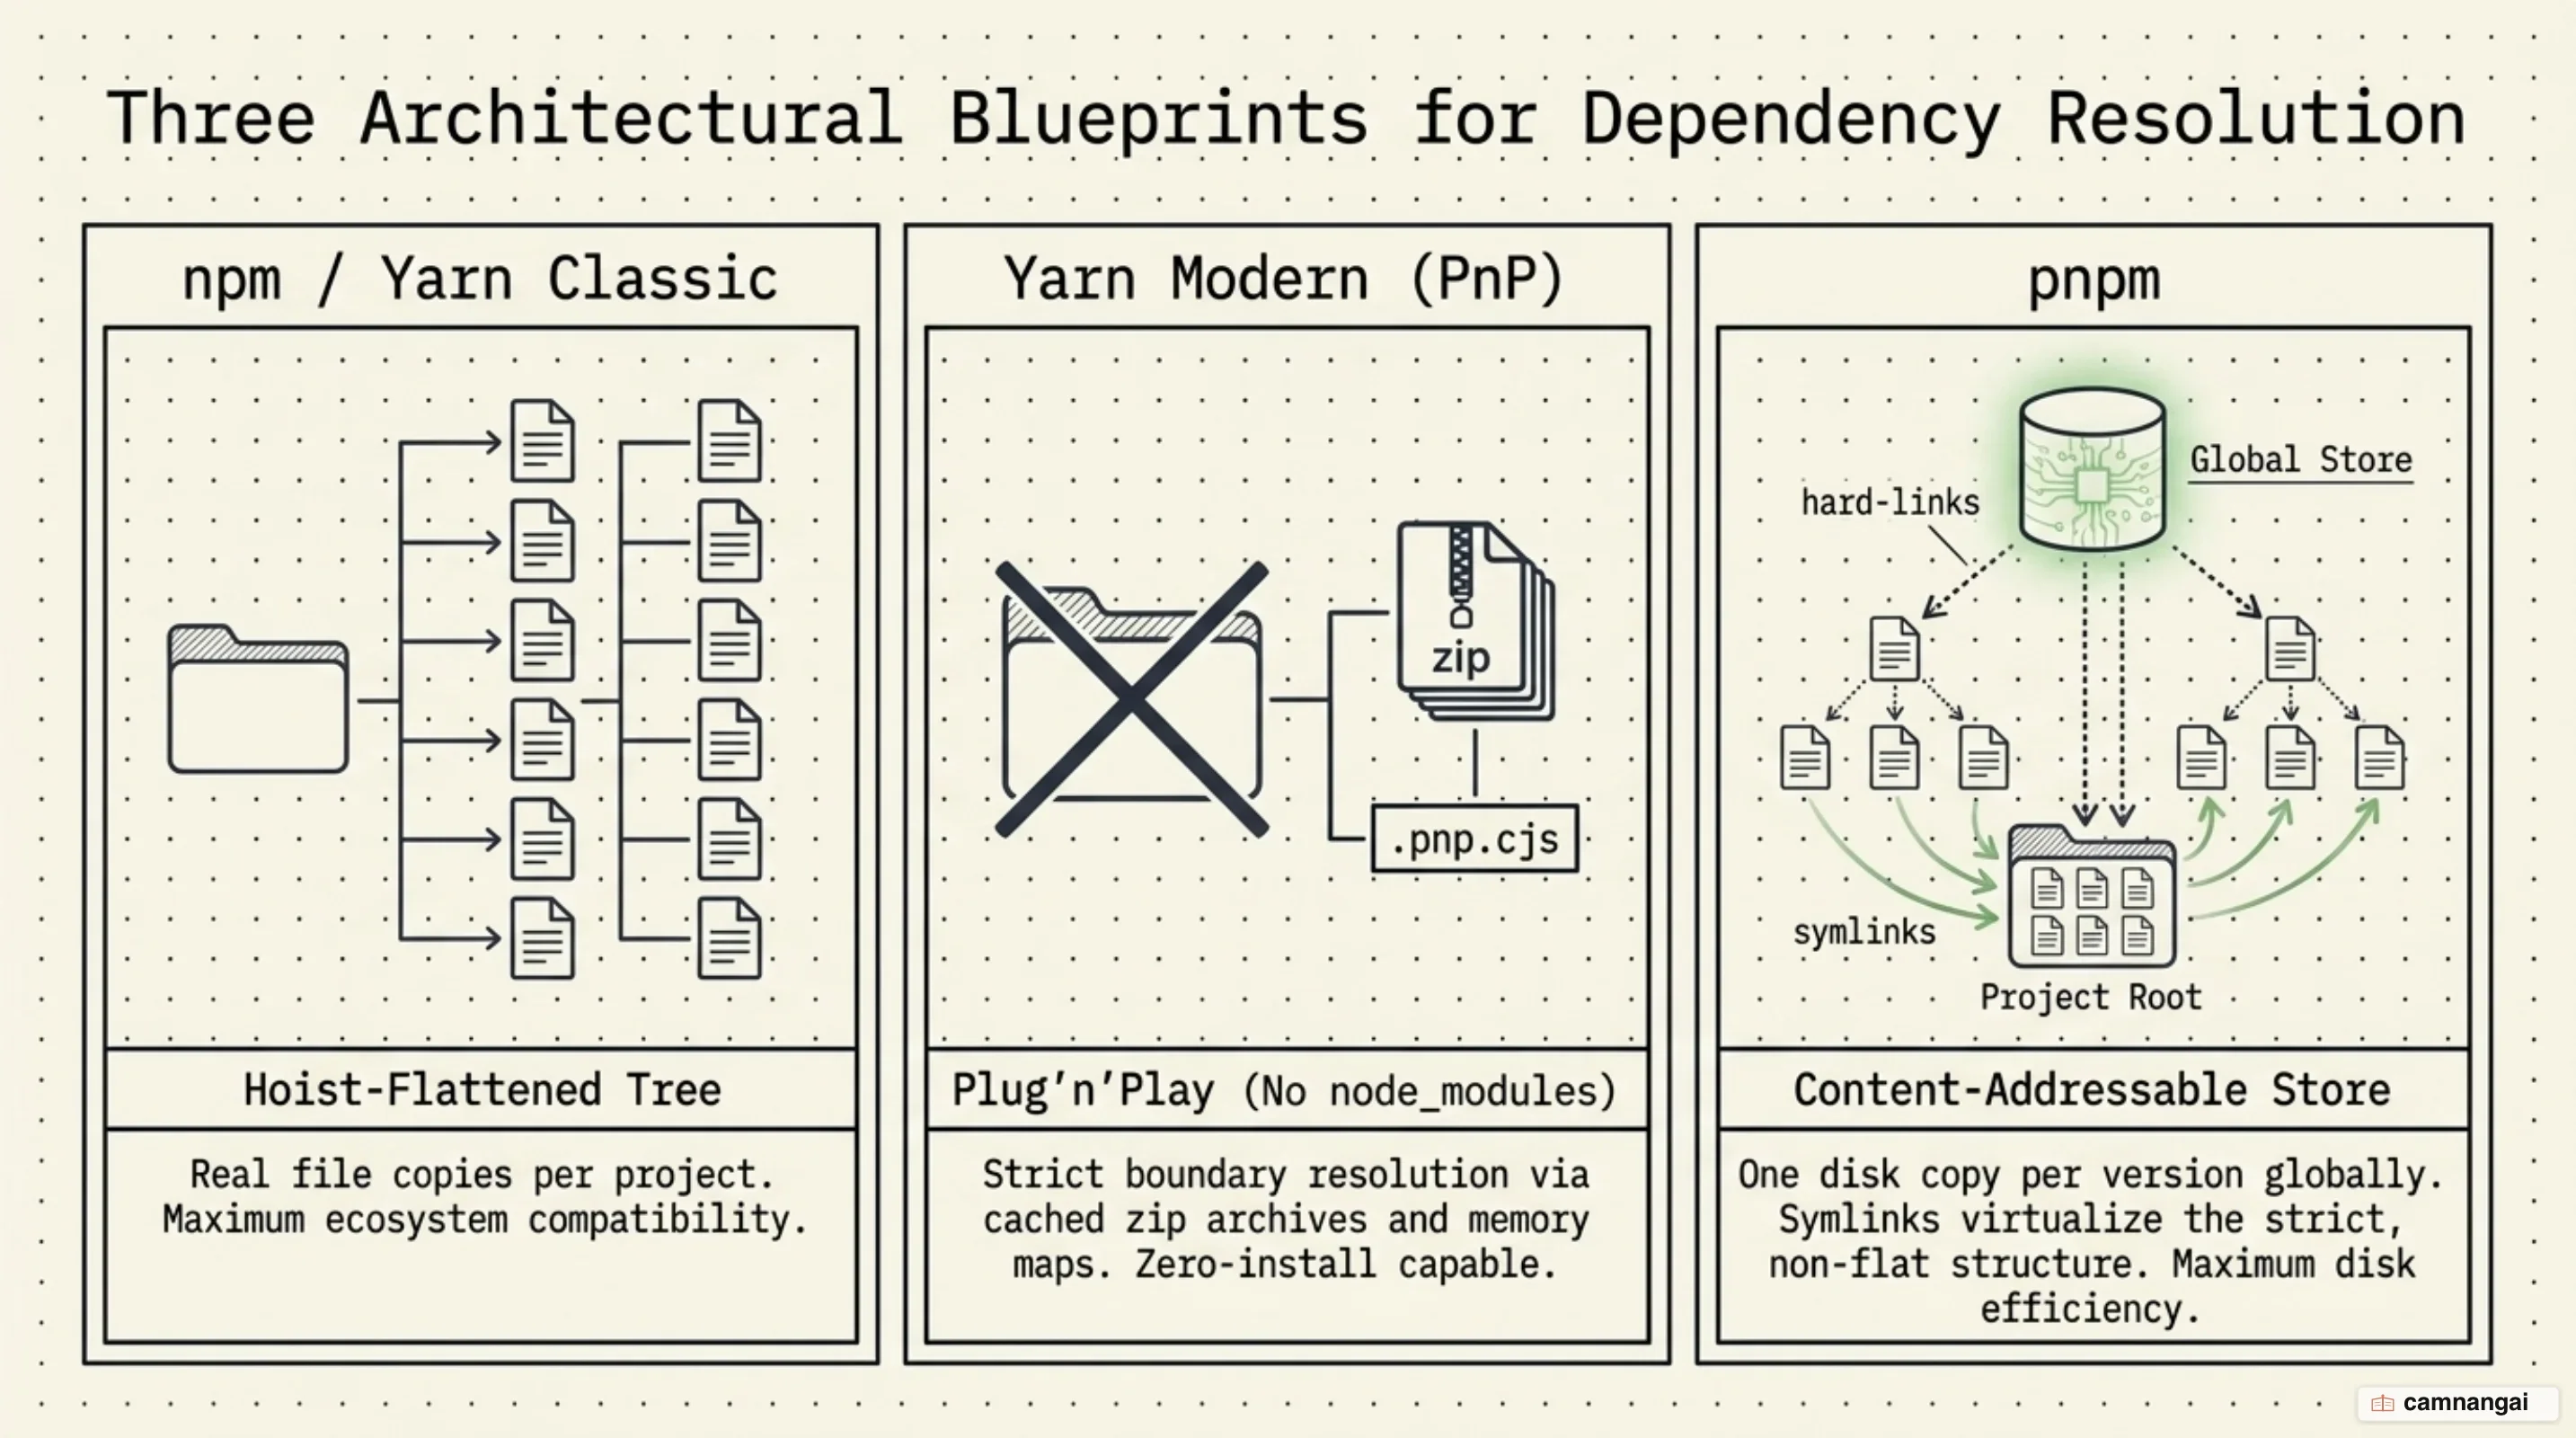
While npm is the industry standard, Yarn and pnpm take different
architectural approaches. npm
historically used a file-copying model to build node_modules, which consumes significant disk
space when multiple projects share dependencies. pnpm instead uses content-addressable storage, with
all packages kept in a single global store on disk and linked into project-specific node_modules
via hard links and symlinks. That reduces I/O overhead and prevents phantom dependencies, where code
can access packages not explicitly listed in its manifest.
Yarn was originally developed to address performance and consistency issues in older versions of npm, introducing its own lockfile format. Each manager has distinct performance characteristics; pnpm is generally faster at installation thanks to its linking strategy and avoidance of redundant network requests. Yarn pioneered many of the caching and parallelization techniques that were eventually adopted into the npm CLI itself.
The internal structure of node_modules varies between these tools, which affects how the Node.js
runtime resolves modules. npm and Yarn typically create a flatter folder structure to manage deep
dependency trees, whereas pnpm's symlink-heavy approach creates a nested structure that more
accurately reflects the real dependency graph. That forces you to be explicit about the libraries
you use, since sub-dependencies are not hoisted to the root by default. Each tool uses its own
lockfile — package-lock.json, yarn.lock, and pnpm-lock.yaml respectively — and all three talk
to the same public registry using the same package.json format.
Choosing between them is a trade-off between standard compatibility and performance. npm is the most compatible and ships with Node.js, which makes it the safest default. pnpm is preferred for monorepos or machines with limited disk space. Whichever you pick, never mix two managers in one project: their lockfiles conflict and the resulting environment stops being reproducible.
Where to start with npm
Start a new project with npm init to generate the manifest, then lean on the two commands that
keep an environment predictable: npm ci for every automated pipeline, and npm audit on a regular
cadence to surface known vulnerabilities in your dependency tree. Commit package-lock.json to
version control so the whole team resolves to the same tree.
npm remains the right default for most projects, provided you understand three things: how version
ranges are locked, how integrity hashes protect what you download, and what npm install is allowed
to execute on your machine. If you run dozens of projects on one machine, evaluating pnpm for its
disk efficiency is worth the afternoon — see
DevOps practice for where these commands sit in a delivery
pipeline.
References
- About npm — npm Docs
- An introduction to the npm package manager — Node.js Learn
- What is npm? A Node Package Manager Tutorial for Beginners — freeCodeCamp
- package.json — npm Docs
- Semver: Tilde and Caret — NodeSource
- How to Understand package-lock.json in Node.js — OneUptime
- npm vs Yarn vs pnpm: Package Manager Selection Guide 2026
- npm install-time security and GAT bypass2fa deprecation — GitHub Changelog
- The npm Threat Landscape: Attack Surface and Mitigations — Unit 42