NestJS is an MIT-licensed, progressive Node.js framework built with TypeScript that provides a modular architecture for developing efficient and scalable server-side applications.
When engineers ask what is NestJS, it is best defined as a platform that standardizes backend structure while maintaining compatibility with both TypeScript and pure JavaScript (via Babel).
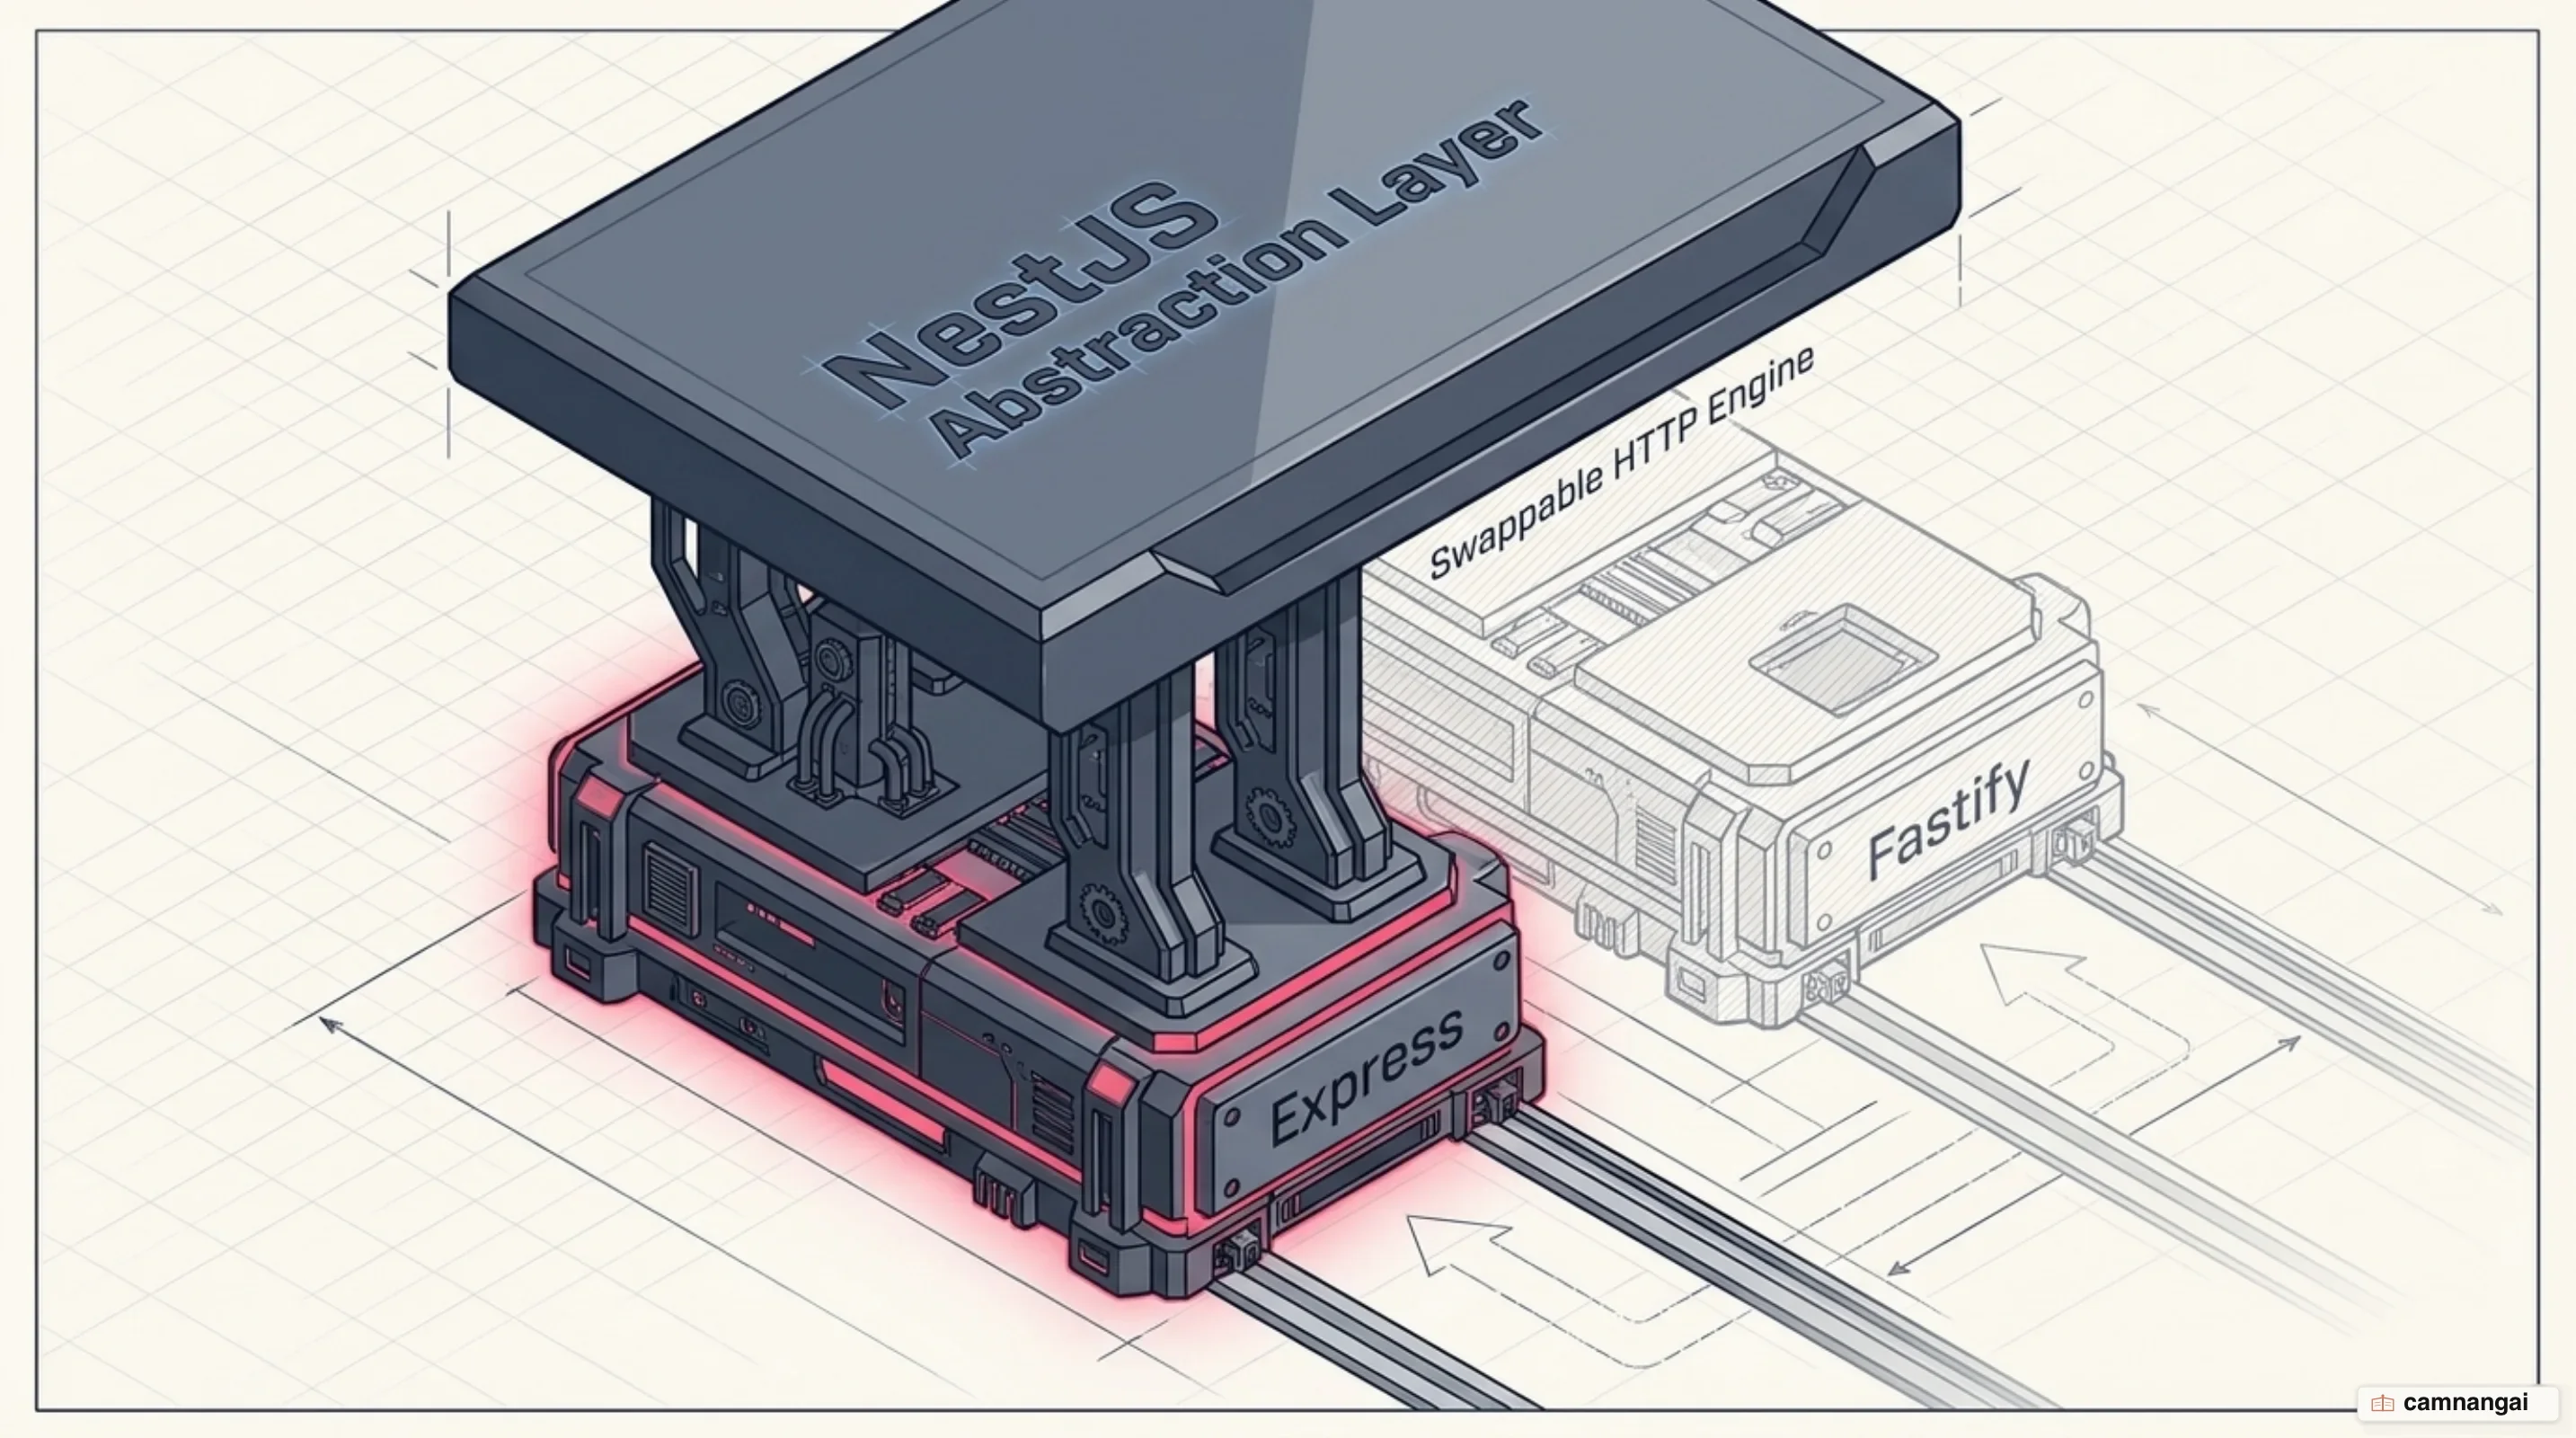
Internally, the framework acts as an abstraction layer over mature HTTP servers, defaulting to Express while offering an optional integration with Fastify for high-performance requirements.

What is NestJS?
NestJS was created in 2017 by Kamil Myśliwiec to solve the "architecture problem" prevalent in the Node.js ecosystem. While Node provides extensive libraries, it lacks a consistent standard for organizing code, which often leads to unmaintainable "spaghetti" backends. NestJS addresses this by bringing consistency and scalability to server-side development through an opinionated, highly structured environment.
The framework is heavily influenced by Angular, adopting its use of modules, providers, and decorators. It successfully synthesizes concepts from Object-Oriented Programming (OOP), Functional Programming (FP), and Functional Reactive Programming (FRP). This combination allows you to build applications that are not only type-safe but also modular and easy to test.
As a platform-agnostic framework, NestJS uses an adapter pattern to wrap underlying HTTP engines. By
default, it uses Express, but you can swap this for Fastify if your application requires maximum
throughput. You can access the underlying platform APIs by passing specific types—such as
NestExpressApplication or NestFastifyApplication—to the NestFactory during the initialization
process.
To implement NestJS, you must use Node.js version 20 or higher. The framework relies fundamentally on
TypeScript decorators and metadata via the reflect-metadata package to wire the various application
components together at runtime.
What does a NestJS application consist of?
A NestJS application is organized around three primary pillars: Modules, Controllers, and Providers. These components interact to form a cohesive system where responsibilities are clearly delineated.
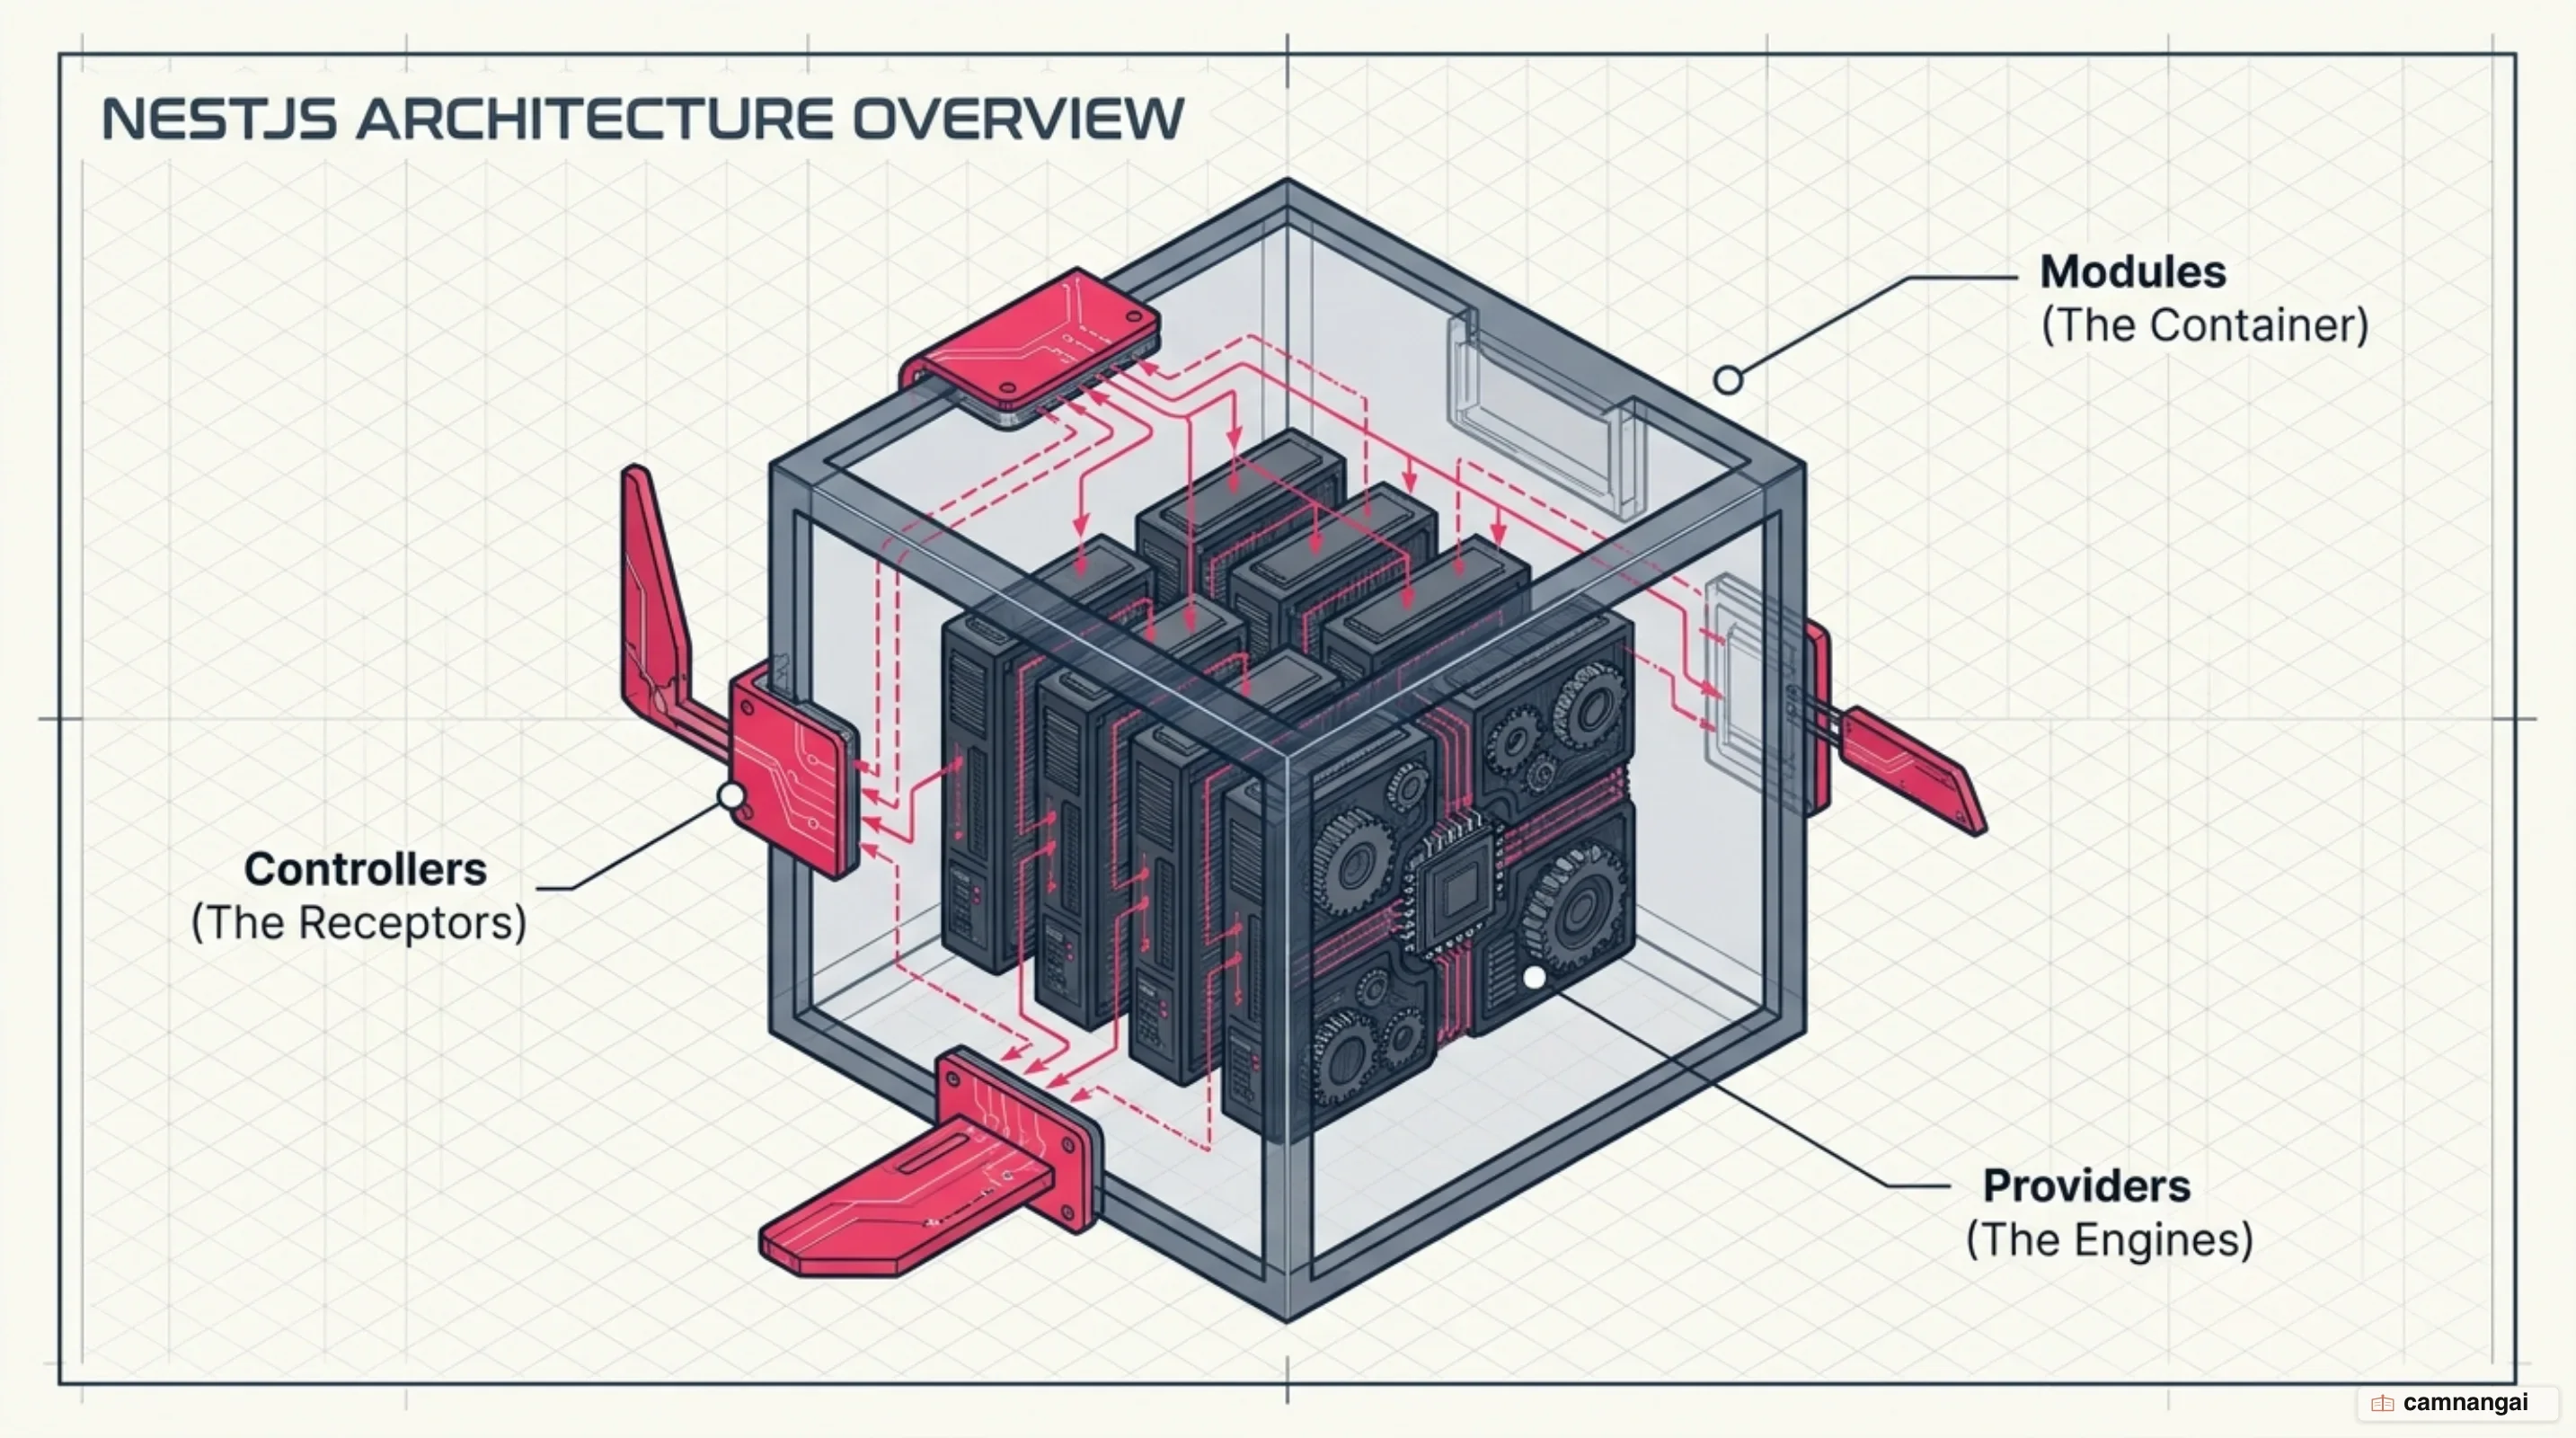
Modules define the logical boundaries of your application. Every project starts with a root module,
typically AppModule, which is the entry point for what Nest calls the "application graph."
This graph is an internal map the framework uses to resolve relationships between all defined
components. You use the @Module() decorator to organize your code into feature sets, specifying
which controllers and providers belong to that specific domain.
@Module({
  imports: [CatsModule],
  controllers: [AppController],
  providers: [AppService],
})
export class AppModule {}
Controllers function as the routing layer, handling incoming HTTP requests and returning responses.
By using decorators like @Controller('path'), you define route prefixes, while method decorators
such as @Get(), @Post(), and @Body() allow you to extract request data with minimal
boilerplate. Controllers should remain lean, focusing on request handling and delegating complex
logic to the service layer.
Providers encompass classes such as services, repositories, and helpers. The defining characteristic
of a provider is that it can be injected into other classes. You use the @Injectable() decorator to
signal the Nest Inversion of Control (IoC) container that the class should be managed and
instantiated by the framework.
interface Cat {
  name: string;
  age: number;
  breed: string;
}

@Injectable()
export class CatsService {
  private readonly cats: Cat[] = [];

  create(cat: Cat) {
    this.cats.push(cat);
  }

  findAll(): Cat[] {
    return this.cats;
  }
}
How does dependency injection work in NestJS?
NestJS uses an Inversion of Control (IoC) container to manage the "wiring up" of objects. The standard pattern is constructor-based injection, where you declare dependencies in the class constructor and the framework automatically resolves and injects them by type.
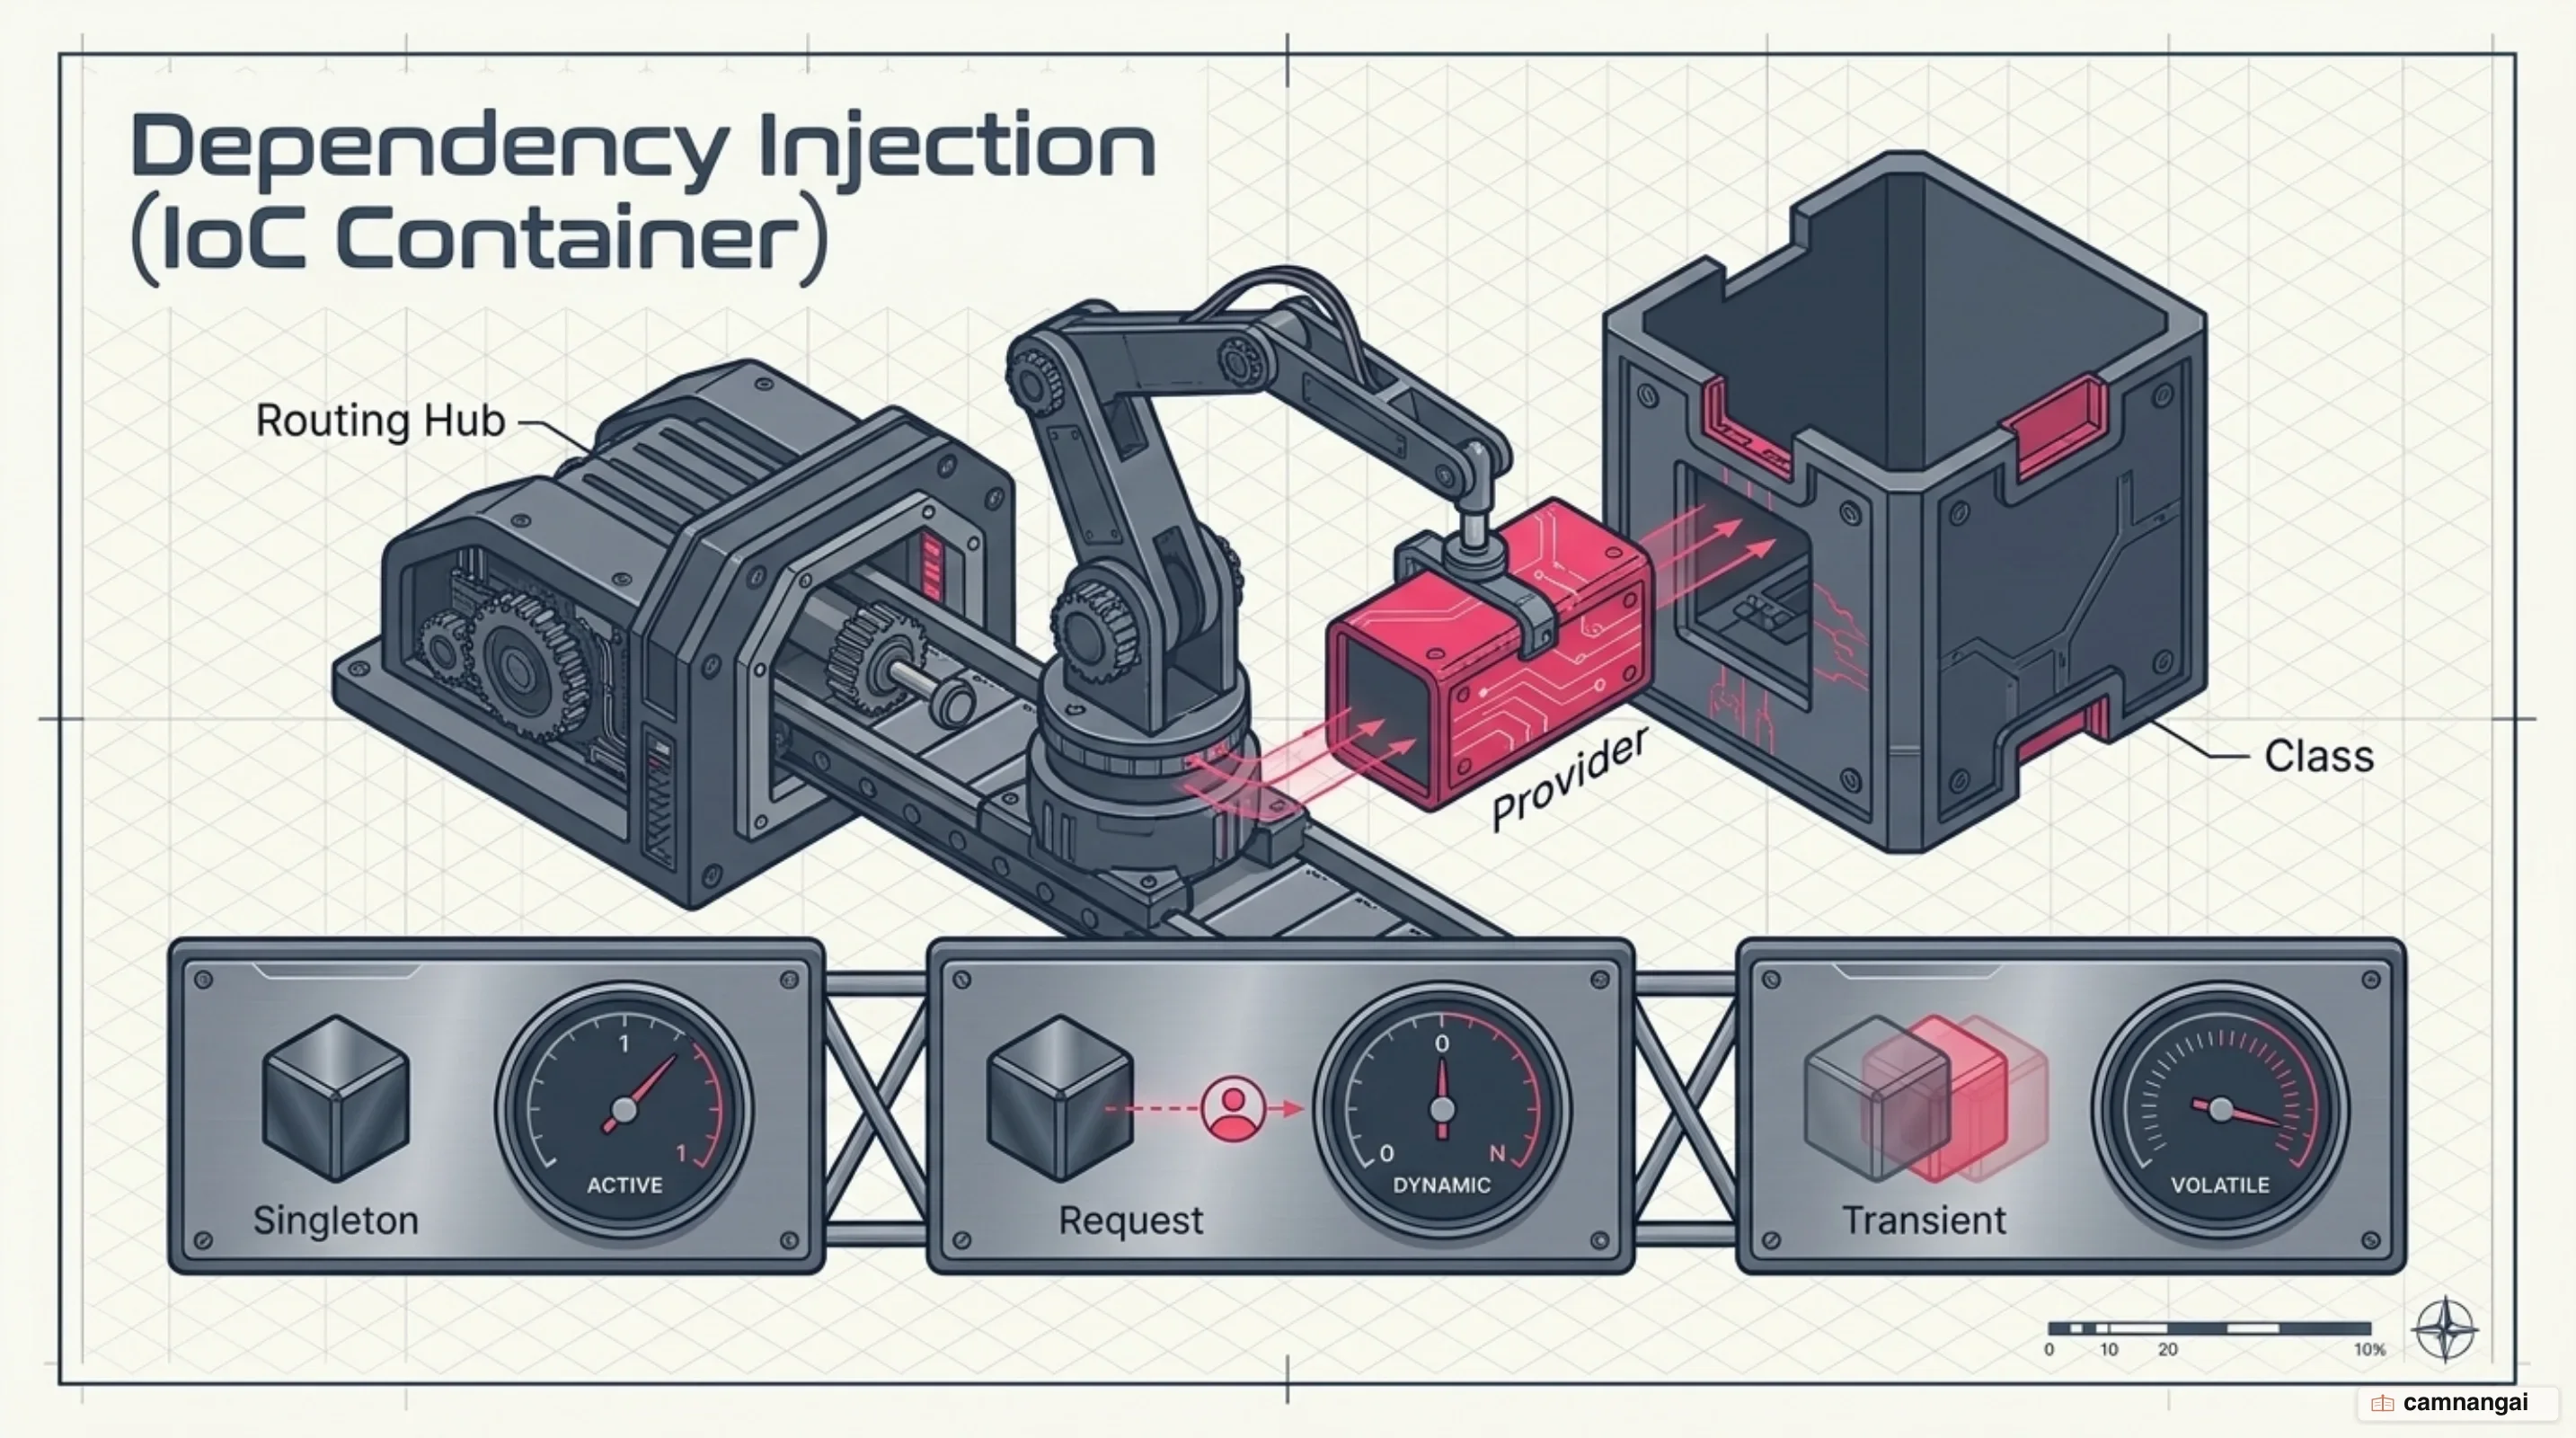
Providers operate within specific "scopes" that determine their lifetime. The default is the Singleton scope, where a single instance is shared application-wide. You may also use Request scope, which creates a new instance for every request, or Transient scope, which provides a fresh instance for every consumer. You must be cautious with Request-scoped providers; they can degrade performance because they force the entire dependency chain to be recreated for every incoming request.
Custom providers offer flexibility beyond standard class injection. You can use useValue for
constant objects or mock data, useClass for swapping implementations during testing, and
useFactory for asynchronous initialization or dynamic configurations that require dependencies from
other services.
While constructor injection is preferred for clarity, Nest also supports property-based injection
using the @Inject() decorator. This is useful in complex inheritance scenarios to avoid passing
multiple dependencies through super(). Additionally, the @Optional() decorator allows you to
define dependencies that do not necessarily need to be resolved for the application to function.
// Constructor-based injection vs a custom provider token
constructor(
  private readonly catsService: CatsService, // Standard injection
  @Optional() @Inject('HTTP_OPTIONS') private readonly options: any // Custom token
) {}
What layers does a request pass through?
Every request in a NestJS application follows a rigorous lifecycle. It begins with Middleware, which you use for cross-cutting concerns like logging or body-parsing. Middleware executes before the specialized Nest layers.

The next layer is Guards. By implementing the CanActivate interface, Guards handle authentication
and authorization logic. They determine if a request should proceed; if they return false or throw
an UnauthorizedException, the request is blocked before it ever reaches a controller.
Interceptors wrap the request and response stream using RxJS. You use them to transform responses—such as wrapping them in a uniform JSON envelope—or to measure execution time. Interceptors provide the ability to add logic both before and after the execution of the route handler.
Pipes are used for data transformation and validation. The built-in ValidationPipe, paired with the
class-validator library, ensures that incoming Data Transfer Objects (DTOs) are correctly typed and
validated. If the data is invalid, the Pipe throws a BadRequestException. Finally, Exception
Filters catch any unhandled exceptions, formatting them into consistent JSON responses to prevent
internal stack traces from leaking to the client.
Under the hood: Express, Fastify and TypeScript decorators
NestJS is designed for flexibility at the engine level. While @nestjs/platform-express is the
default because of its massive ecosystem, you can switch to @nestjs/platform-fastify to achieve
significantly higher throughput.
The framework relies on TypeScript decorators to read metadata at runtime. The reflect-metadata
package is essential here, as it allows Nest to identify the relationships between modules,
controllers, and providers. The application bootstraps in the main.ts file, where
NestFactory.create(AppModule) triggers the resolution of the entire application graph.
// main.ts bootstrap example
async function bootstrap() {
  const app = await NestFactory.create(AppModule);
  // Default port configuration
  await app.listen(process.env.PORT ?? 3000);
}
bootstrap();
What NestJS 11 brought
Released in early 2025, NestJS 11 introduced major internal optimizations. The most significant change was the overhaul of the module opaque key generation. By switching from slow hash-based serialization to object references, the framework significantly improved startup times for large-scale applications.
The ConsoleLogger now includes built-in JSON logging support, which is critical for modern
containerized environments. While JSON logging disables terminal colors by default to keep logs clean
for parsers, you can re-enable them for local development by setting colors: true in the options.
const app = await NestFactory.create(AppModule, {
  logger: new ConsoleLogger({
    json: true,
    colors: true, // Re-enable for local readability
  }),
});
Microservice transporters (NATS, Kafka, Redis) gained the unwrap() method, providing direct access
to the native client for low-level configurations. A new status observable also allows for
real-time connection monitoring. NestJS 11 also supports Express v5 and Fastify v5. In Express v5,
wildcards now require explicit naming, such as @Get('users/*splat') instead of @Get('users/*').
Note that splat is just a naming convention; you can use any identifier, such as *wildcard.
Project structure and the mistakes teams make
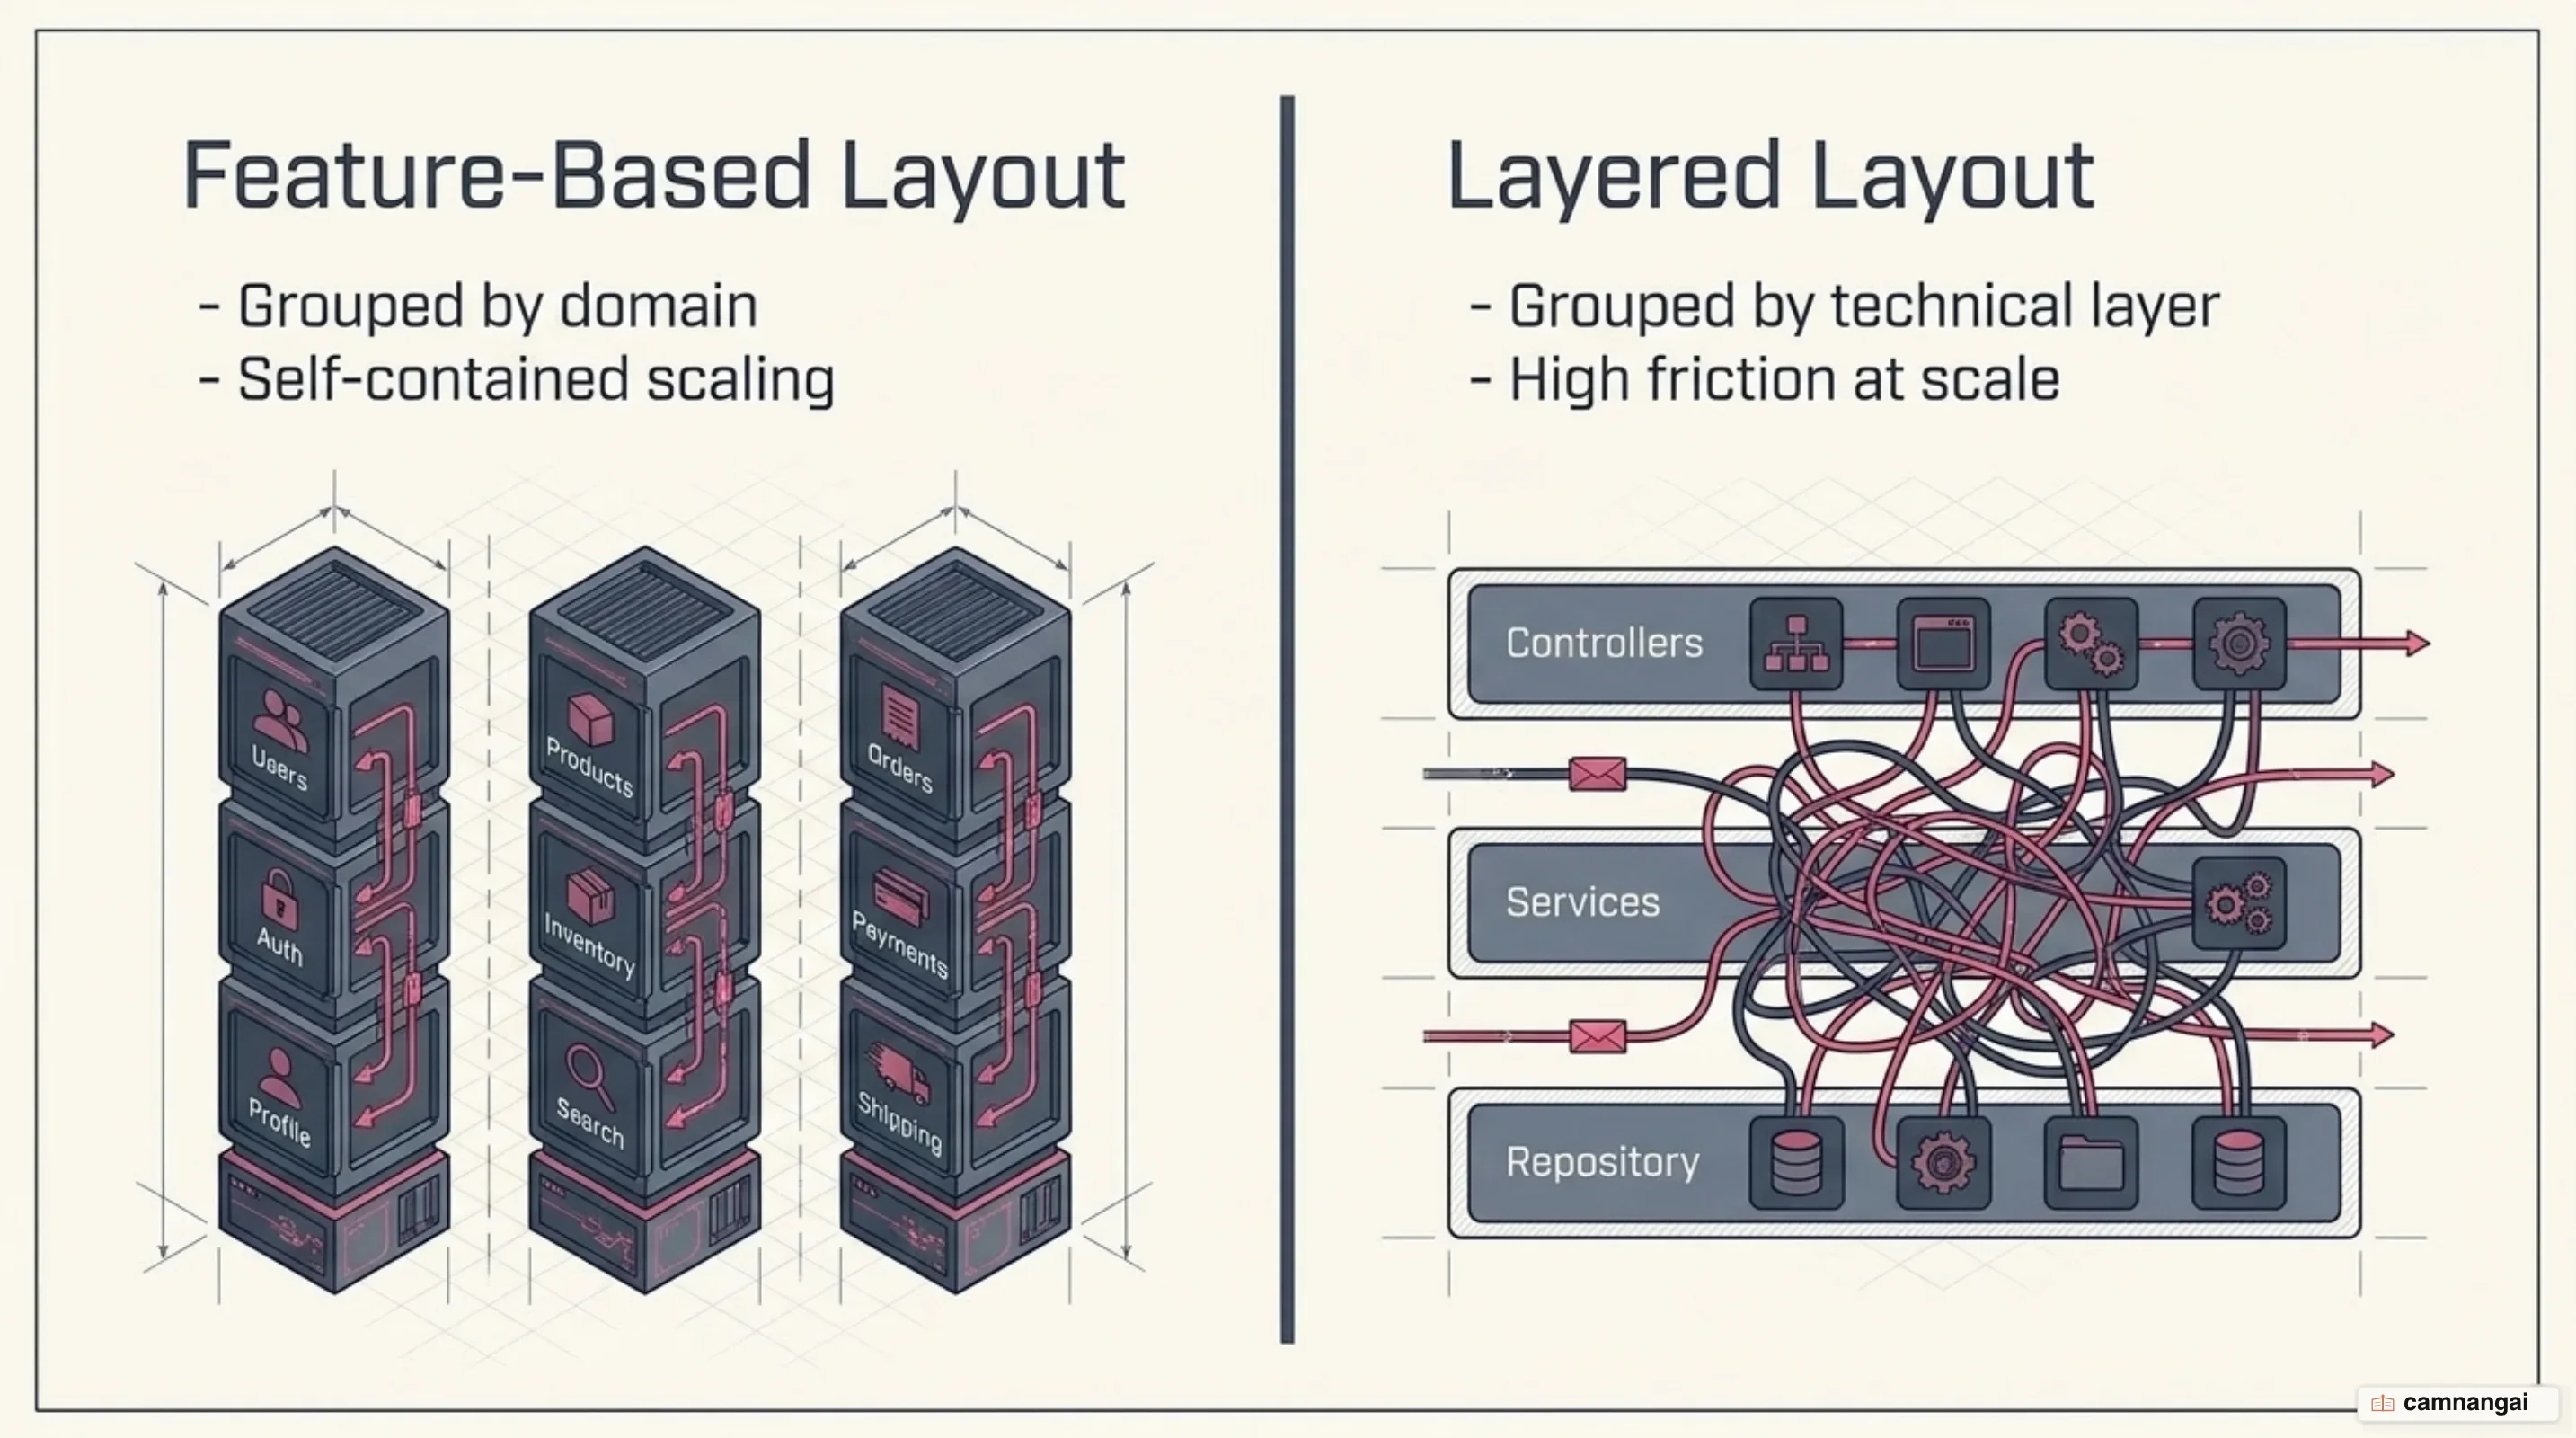
You should use a "feature-based" folder structure. Grouping controllers, services, and DTOs by domain
(e.g., /users, /orders) is superior for maintainability. Avoid the "layered" structure (placing
all controllers in one folder and services in another), as it becomes a navigational nightmare in
large projects.
A common pitfall is the strictNullChecks trap. Nest's default tsconfig.json often leaves this
disabled, which can result in a minefield of null reference errors. You should enable strict null
checks immediately during project setup. Additionally, while forwardRef() can resolve circular
module dependencies, frequent use of it usually indicates a flaw in your architectural design.
Finally, never expose database Entities directly from your controllers. This leaks internal schema details and tightly couples your API to your database. Use Data Transfer Objects (DTOs) for the API contract. DTOs and Entities may look identical at first, but they always diverge as the application matures.
NestJS or Express — which should you pick?
The choice depends on your project scale. Express is un-opinionated and flexible, making it suitable for lightweight applications or small, highly specialized teams. However, that lack of structure often leads to "messy" code as the application grows in complexity.

NestJS is the preferred choice for enterprise-level applications and large-scale systems. It provides the consistency required for multi-developer teams to work efficiently. However, there is a "hidden cost" to NestJS: the framework wiring—modules, decorators, and providers—can introduce more development overhead than it returns in value for tiny projects with only 2 to 5 developers.
Where should you start with NestJS?
To start, install the Nest CLI globally using npm i -g @nestjs/cli and create a new project with
nest new project-name. The CLI is your primary tool for scaffolding consistent, boilerplate-free
code.
For any production-bound project, use the --strict flag during creation. This avoids technical debt
by enforcing a stricter TypeScript feature set from day one, so you use the modular structure as
intended.
References
- First steps — NestJS Documentation
- Providers — NestJS Documentation
- Modules — NestJS Documentation
- The NestJS Handbook — freeCodeCamp
- Announcing NestJS 11: What's New — Trilon Consulting
- NestJS vs. Express.js — LogRocket Blog
- The (hidden) dangers of NestJS — Nathan Brachotte
- NestJS Project Structure Best Practices 2026 — Encore